
A.K.I
A.K.I. — 对策
Key Info
- Sustained overhead with combo follow-up
- 3MP
- Defense options
- Strike invincible from frame 1: 236KK (OD Snake Step)
- Anti-air invincible from frame 6: 236HP (Heavy Snake Whip)
- SA1 (236236K) startup 10F, no projectile invincibility
- SA2 (214214P) startup 7F, no invincibility
- SA3 (236236P) startup 10F, fully invincible
- Moves that are plus on block
- 6HK
- 214KK
- 2MK
Neutral Game (Focus Points)
- Dealing with 214LP (Purple Smoke Bomb)
- Because A.K.I. has 214LP and the Venom Fang (Moudoku-ga), avoid walking backward as a habit
- Walking forward and blocking 214LP close reduces A.K.I.'s frame advantage so her overhead and Cancel Rush pressure won't connect cleanly
- Even after eating 214LP, walk forward as much as possible
- Be aware of delayed strike pressure
- A.K.I. finds it difficult to confirm throw whiffs
- Crossup coverage with special anti-airs is also limited in certain situations — when at disadvantage, mixing in forward jumps can turn things around
- Watch out for crossup attacks
- A.K.I.'s crossup (前ジャンプ中) 2HP (Dipping Viper) has an extremely strong hitbox — anti-air normals almost never beat it
- Special anti-airs also often lose since her attack arrives first — when shimmy-ing, back off fully so she cannot reach you with the crossup
- A.K.I.'s strong crossup only has a crossup hitbox — it cannot hit on the front side
- Punish 236K (Snake Step)
- OD Snake Step (236KK) has strike invincibility
- On okizeme, when looking for a shimmy, pull back and wait — this creates a window to punish 236KK
- On meaty jump-in setups, buffer a throw in your jump attack so you can throw 236KK — don't skip this
- Don't worry about lows
- A.K.I. has no c.MK Cancel Rush — even at attack range, you can walk back more and create opportunities to whiff punish
- Watch out for overhead on your wakeup
- Always be on guard for her overhead setplay during your okizeme
バーンアウト固め連携
LP → MP → 2PP→K → LP → MP → 214LK
A burn-out pressure string that excels at chip damage and corner carry.
Recommended counters
It can be hard to follow what A.K.I. is doing in this string, but the 214LK used in the second pressure sequence can be made to whiff with your own forward-advancing low.
Every character has a forward-advancing low — use yours to steal the initiative.
Gong Fu(前跳中)

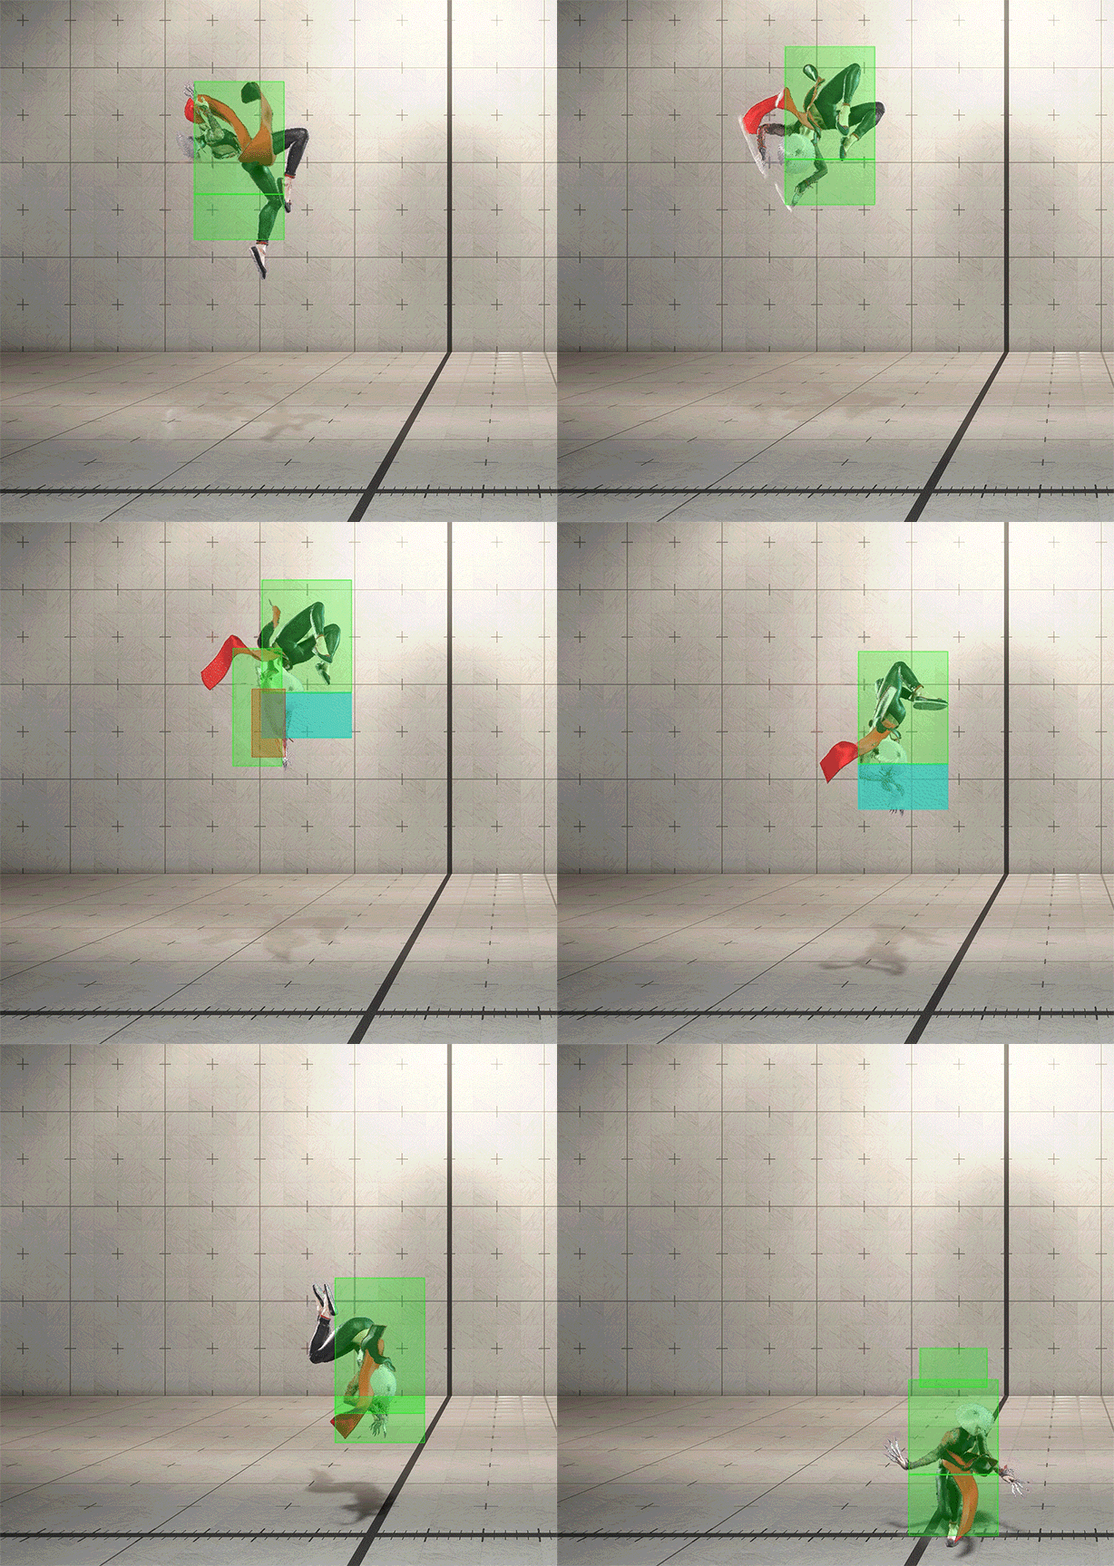
This move has an absurd crossup hitbox, but almost no hitbox on the front side. A.K.I. herself whiffs it often when the spacing is off, and if you're sitting on parry when that happens, you're walking into a panic-counter throw and possibly losing the round.
Recommended counters
On A.K.I.'s close-range forward jump, skip the parry and walk forward to let it whiff, then press a heavy button as a fuzzy. Don't let her punish you for her own mistake.



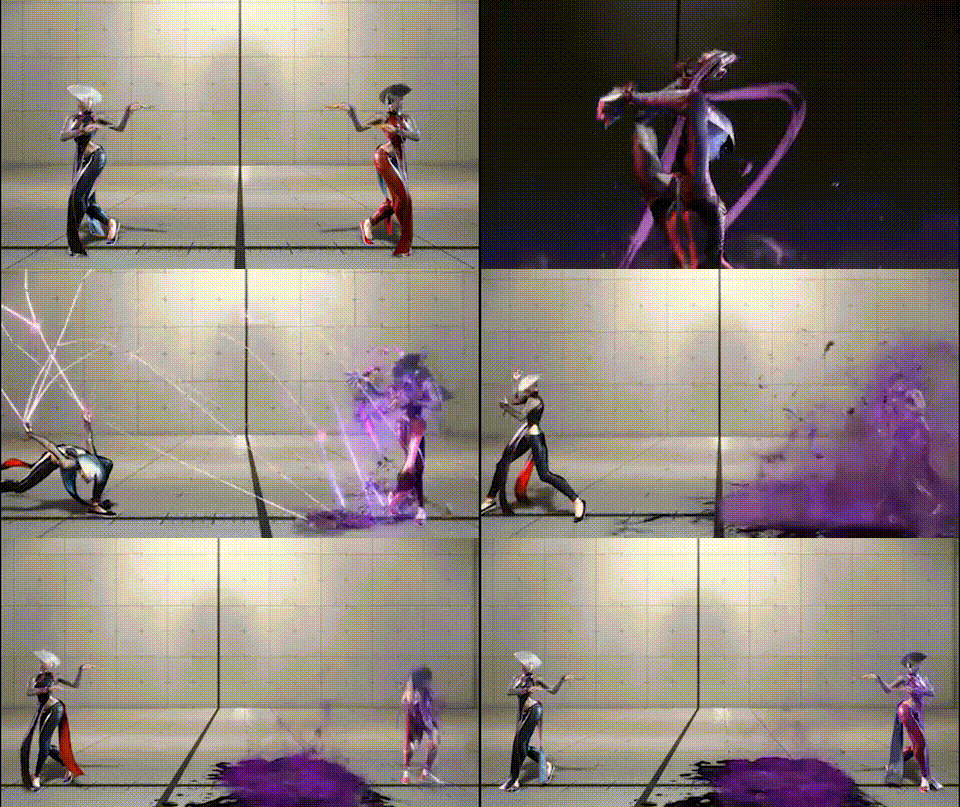
An uncommon situation, but SA2 can be blocked from long range. Knowing the punish from that spacing is worth the investment.
Recommended counters
- Parry → Drive Reversal → Drive Rush
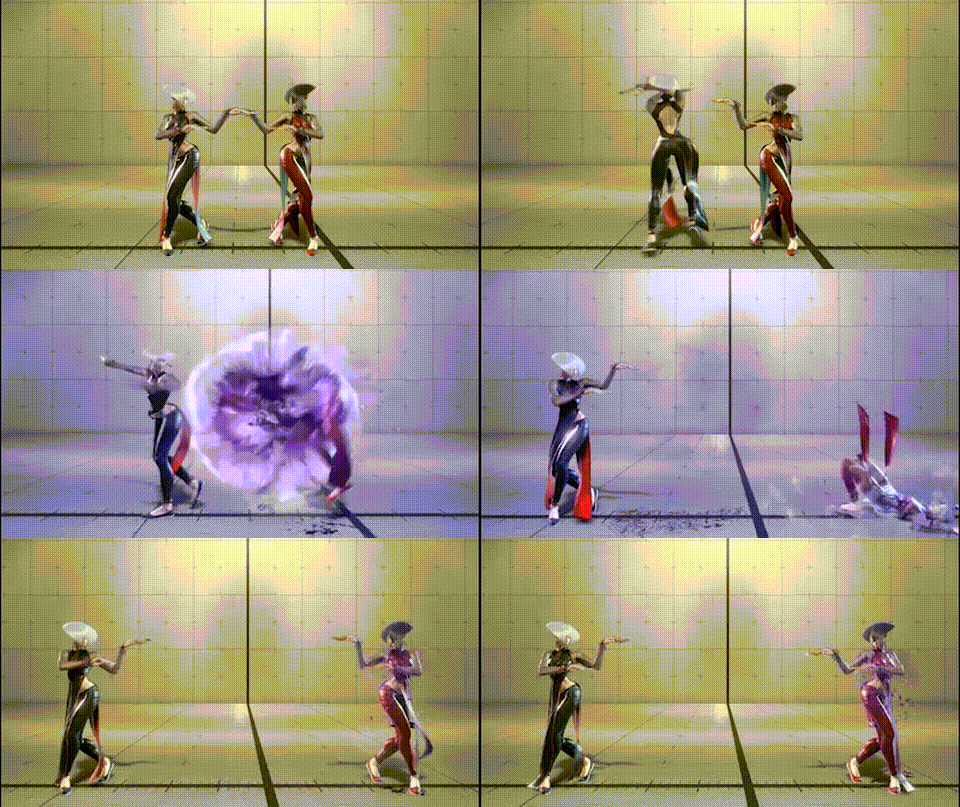
A.K.I. is -4 on block.
Recommended counters
-4F — disadvantaged but hard to punish. Hold block and wait to see what A.K.I. does next. If your character has a 3F button, a fast mash is a live option.


214K behavior changes meaningfully by strength, and the OD version (214KK) plays by completely different rules. Sort out punishes and reversal options up front.
Recommended counters
By strength
- 214LK / 214MK / 214HK: all guaranteed punish on block
- 214KK (OD): A.K.I. is +2 on block, knockdown on hit
- Normal-attack anti-airs lose more often than they win — invincible anti-airs are the reliable answer
- If reacting cleanly is too tight, Drive Reversal is guaranteed — just press it
- A.K.I. has an SA3 read to break Drive Reversal but it's a hard input
Reading 214KK on block
214KK is +2 point-blank. From slightly further out a shimmy becomes possible, so Drive Reversal to push her back is strong.
Warning: just-parry on hit 1 → DI gets crushed
214K is a 4-hit move, so just-parrying the first hit and going for Drive Impact gets crushed. To run JP→DI you need to crouch-block hit 1, just-parry hit 2, then DI.
It's hard in a real match — just answer with an invincible reversal or a strong matching normal.

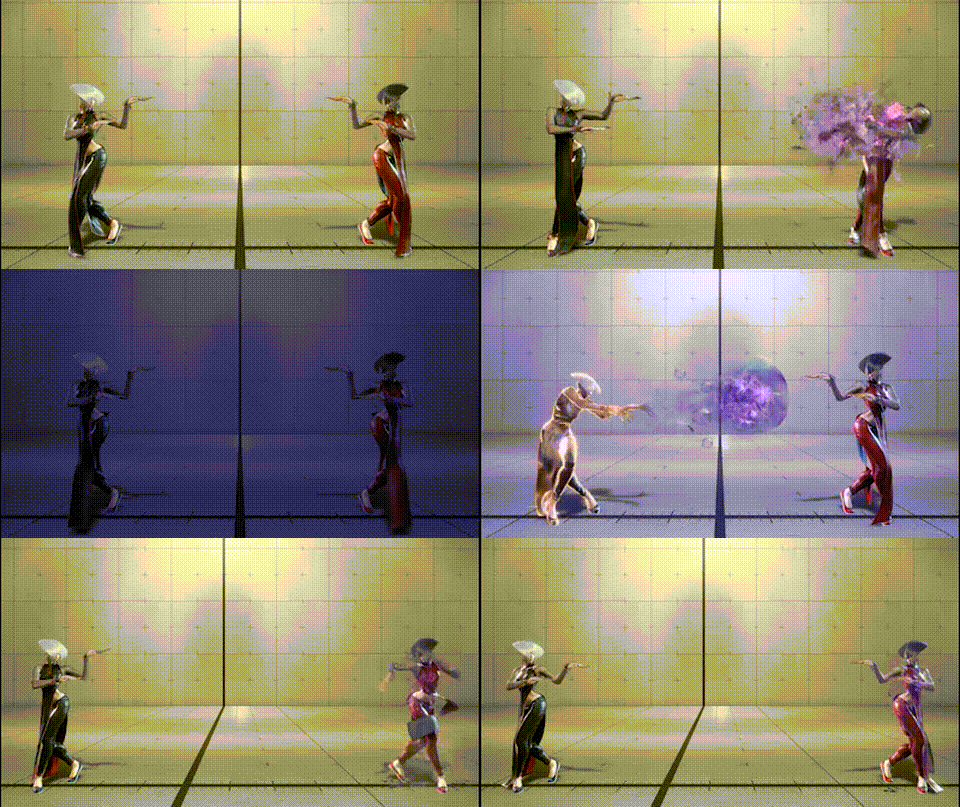
214LP is a slow-moving projectile. The instant it's fired the round is on A.K.I.'s clock, but its total recovery is long enough that jumping pays well. OD (214PP) plays the same way for defense.
Follow-ups:
- 214LP→6P (Nightshade Chaser)
- 214PP→6P
Recommended counters
Vs 214LP
- Inside mid-range: see drive rush → invincible reversal, or bait the rush and neutral jump
- Outside mid-range: anti-air or late-reversal-blocked is a risk, but "do nothing" is worse — pick some answer
- A correctly-timed neutral jump can flip into a punish
- If neither jumping nor reversal works for your character, input parry before the bubble hits — your hurtbox shifts forward and breaks the connecting guard chain on the second hit
- That gap creates a window for an invincible reversal mind-game
- If the timing forces you to block, walk forward to block at close range rather than backing up
- It shortens A.K.I.'s frame advantage and makes her follow-up rush strike/throw incomplete
Spacing dictates the choice, but blocking close while ready for the rush is the safer default. Use parry to block — bigger guard hitbox, smaller frame deficit, and a bonus just-parry if you nail it.
Vs 214PP (OD)
- Same idea: walk forward into the block
- Vs 214PP → step → walk-up pressure, throws get hard to land — at that point parrying the 214LP recovery is fine
- Caveat: parrying 214LP gives you less guard pushback, so you become easier to throw
- Vs 214PP → raw drive rush: be ready to interrupt with Drive Reversal or an OD invincible
- If you don't walk forward to chip frames off, you don't have a window to interrupt — keep moving and watch what A.K.I. does



Nightshade Chaser is the follow-up branch off 214LP (Nightshade Pulse) where A.K.I. extends her talons to burst the bubble. Defending it is tied directly to how you handle the Nightshade Pulse block string.
Recommended counters
- Same family of answers as Nightshade Pulse: A.K.I. has a frame advantage right after firing, but the total recovery is long enough that jumping or walking forward is rewarded
- Because 214LP→6P (Nightshade Chaser) is a real follow-up, inputting parry before 214LP hits shifts your hurtbox forward and breaks the connecting guard chain on the second hit
- That opens a window for an invincible reversal — turn it into a yomi situation in your favor
- Use parry to block when you must — wider guard hitbox, smaller frame deficit, and a bonus just-parry if you nail it

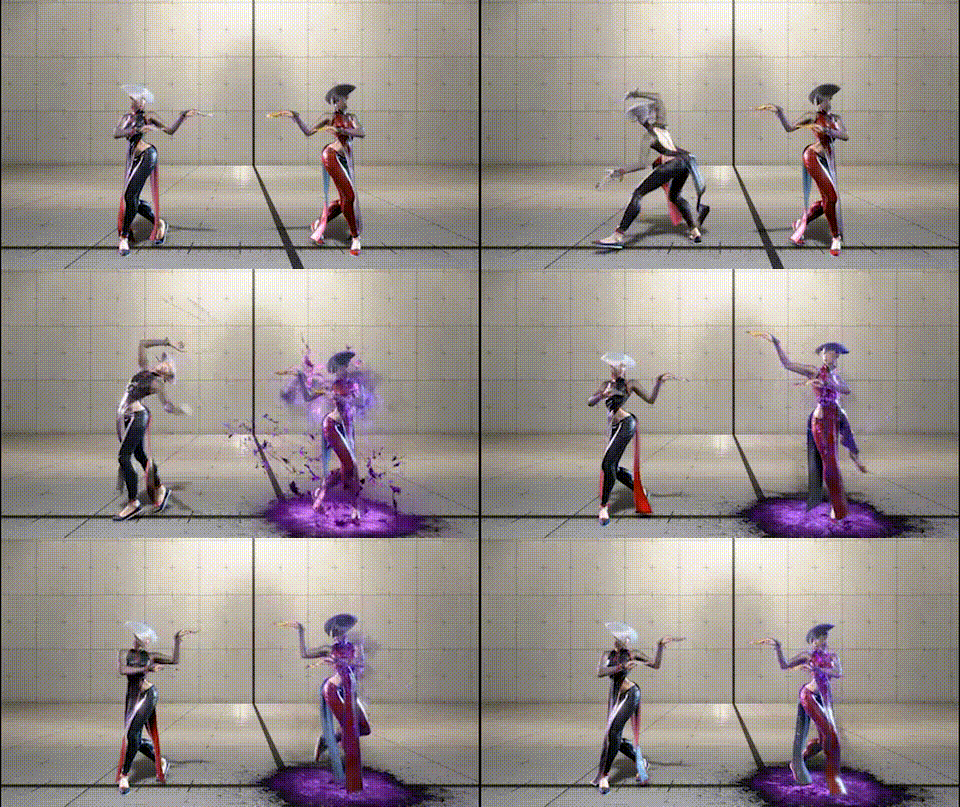
The poison pool itself is a trap — the key is not walking into it. Identify the placement and route around it rather than blocking through it.
Recommended counters
- Keep track of where the pool is placed and avoid stepping into it
- Jump or dash over it rather than walking through it
- Press the advantage when A.K.I. commits to planting the pool, as the startup leaves her momentarily open


Snake Step's distance varies by strength. Each version plays a different role.
- 236LK: feint — moves barely forward, used to bait reactions
- 236MK: used for wake-up pressure; leaves A.K.I. at +5 point-blank, removing walk shimmy from her kit
- 236HK: longer dash, used to approach
- 236KK (OD): can be throw-countered on read for a panic counter
Recommended counters
vs 236MK Used as an oki tool. Recognize that at +5 point-blank A.K.I. cannot walk shimmy — plan your defense accordingly.
vs 236KK (OD) Throw for a panic counter on read. A unique throw-buffer technique exists specifically for A.K.I. — worth learning.
- Safe jump throw buffer: input throw just before the safe jump attack lands. If A.K.I. used 236KK, the throw connects.
- A.K.I. has no OD invincible reversal, so you don't need to hold back
- Input neutral or forward to avoid accidental back throw — forward input is also fine since A.K.I. only has SA invincibility
- Light chain throw buffer: replace the chain-cancel window of a light string with throw input. Throw lands only when A.K.I. has used 236KK.
- Input neutral or forward to avoid accidental back throw
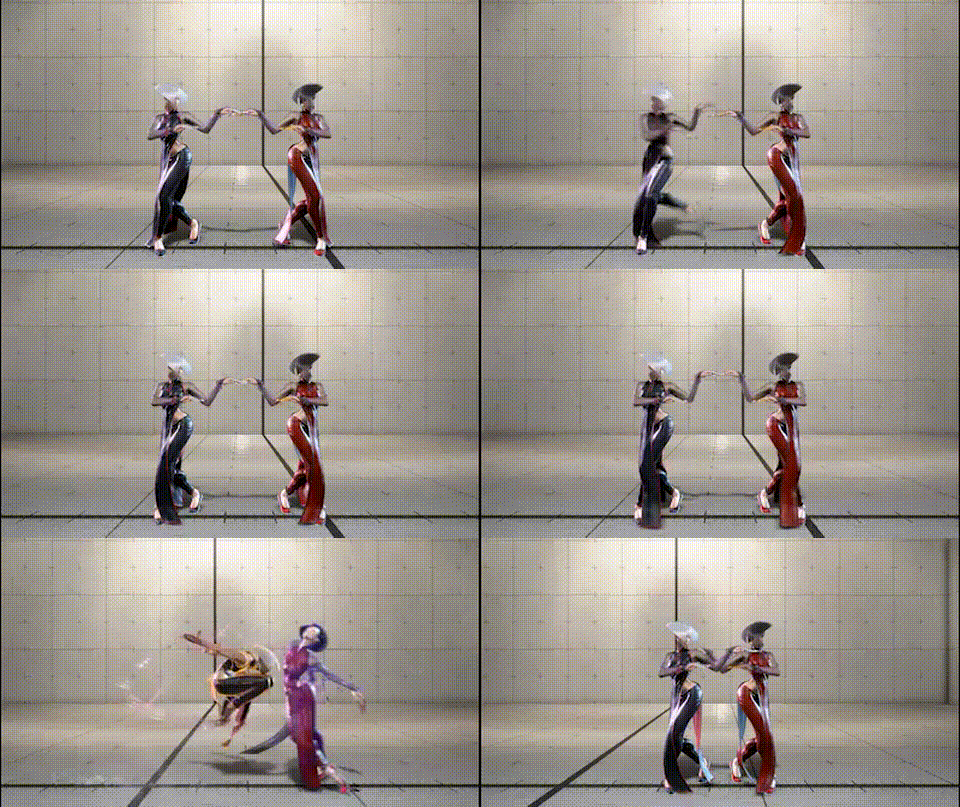
Serpent Lash plays a very different role at every strength — counter each version on its own terms.
Recommended counters
Vs 236LP
- Forward jump or Drive Impact catches it cleanly — keep them on the menu
- At close range, fast long-reach normals (e.g. standing LK on many casts) can punish on block (character-dependent)
Just-parry + drive rush against long-range pokes
It's tight, but you can attempt a just-parry while buffering drive rush — this slaps risk onto her whiffs.
Vs 236MP
- Used as an anti-air against neutral jumps
- The reward is real but the read is hard — don't drop neutral jump as a tool just because it exists
Vs 236HP
- Aerial-invincible anti-air with a hitbox that only covers directly above her
- If she only ever uses 236HP for anti-air, empty jump is extremely strong
Vs 236PP (OD)
- -14 on block
- At close range, take the guaranteed punish
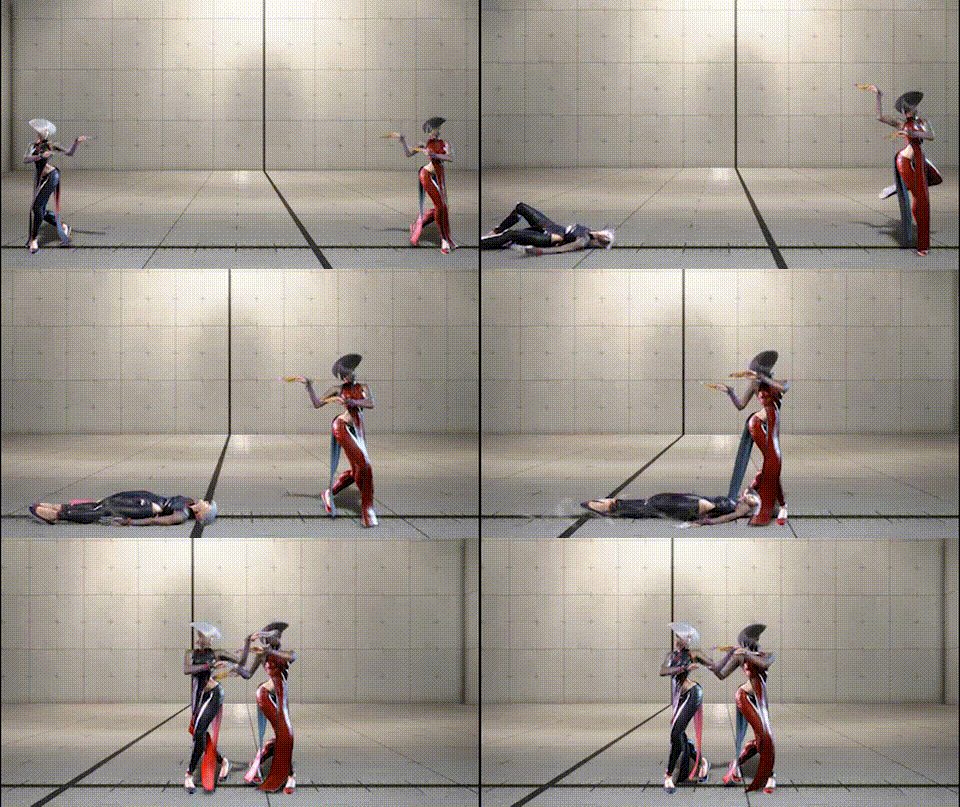
Sinister Slide is a stance she can cancel into from any normal. Three follow-ups branch from it:
- 2PP→P (Venomous Fang): projectile invulnerable
- 2PP→K (Heel Strike): strike
- 2PP→LPLK (Entrapment): command grab
When canceled from HK, 2PP becomes a strike/throw mix-up. (You can technically fuzzy with a 4F press timed to 2PP→K, but A.K.I. can delay the input — you can't fully trust it.)
Recommended counters
Fuzzying works in theory, but if A.K.I. delays it just collapses back into a guess. Rather than complicating the read, lean on these branches:
- Read 2PP→LPLK → mash a max-damage heavy on reaction
- You lose to the strike (it counter-hits into a combo) but accept that as the cost of doing business
- Read 2PP→K → Drive Impact
- You lose to 2PP→LPLK, but the damage is low
- Press DI aggressively to balance the risk/reward
For fuzzy attacks always use a crouching button — standing buttons whiff over the slide.
The clip below records:
- HK → 2PP→K
- HK → 2PP→LPLK
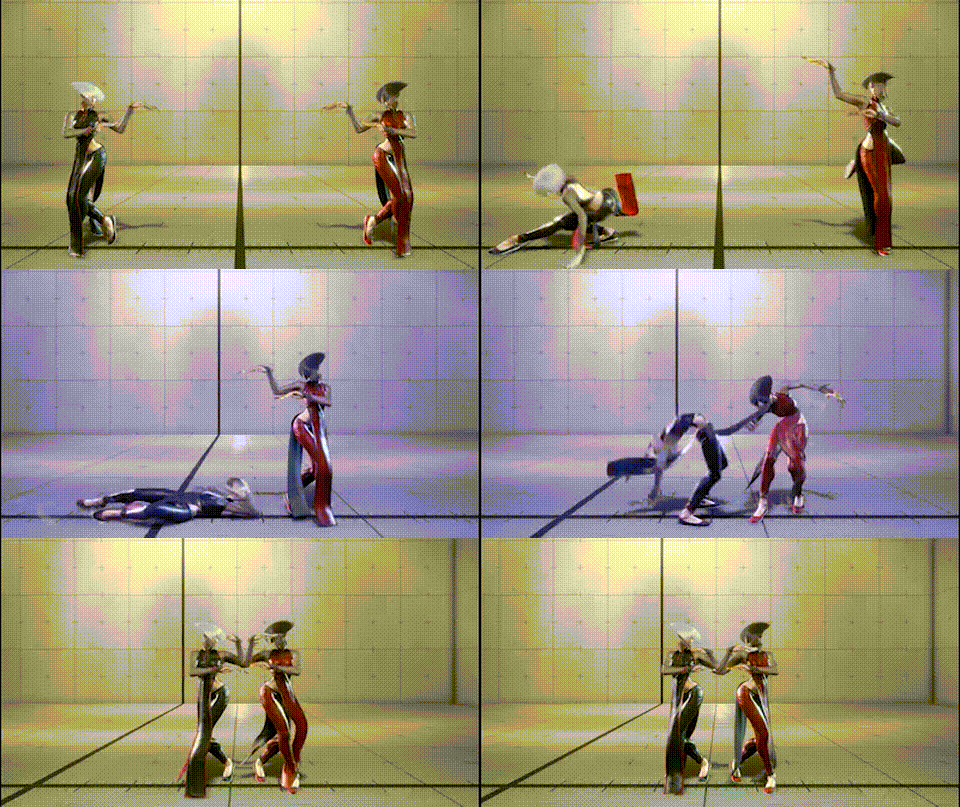
Heel Strike is the strike branch out of Sinister Slide (2PP); its main job is forming a strike/throw mix-up with Entrapment (2PP→LPLK).
Recommended counters
- Read 2PP→K (Heel Strike) → Drive Impact
- You lose to 2PP→LPLK (Entrapment), but the damage is low
- Press DI aggressively to balance the risk/reward
- If you fuzzy it, always use a crouching button — standing buttons whiff over the slide
The clip below records:
- HK → 2PP→K
- HK → 2PP→LPLK

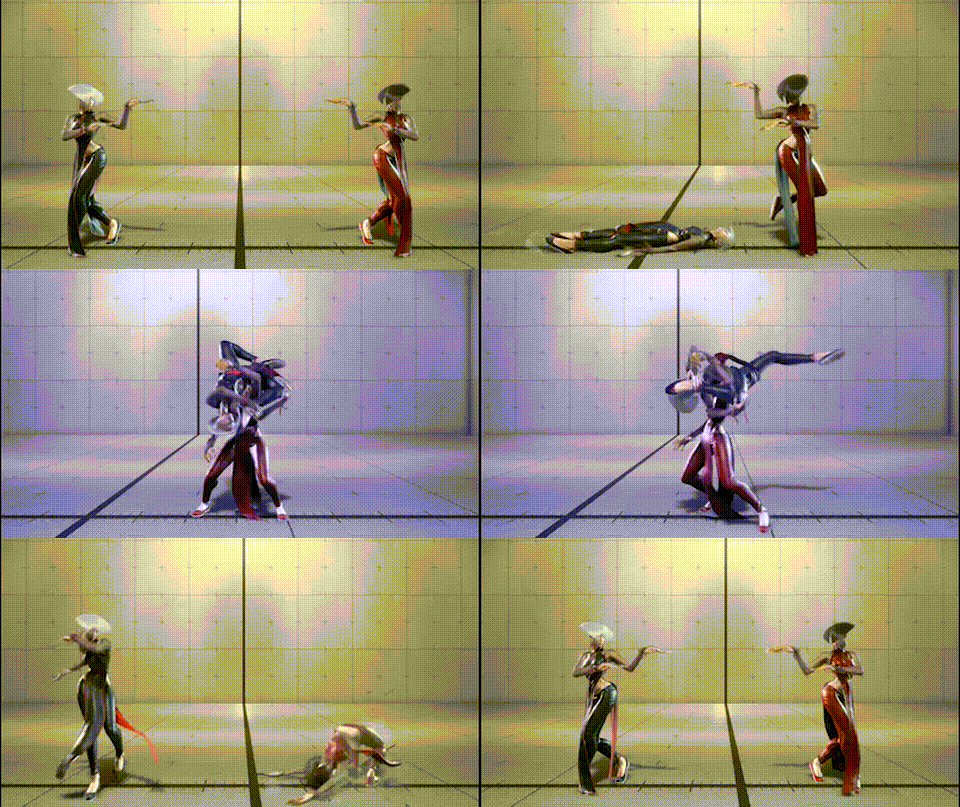
Entrapment is the command-grab branch out of Sinister Slide (2PP); paired with Heel Strike (the strike branch) it forms a strike/throw mix-up.
Recommended counters
- Read 2PP→LPLK (Entrapment) → mash a max-damage heavy on reaction
- You lose to the strike (it counter-hits into a combo) but accept that as the cost of doing business
- Fuzzying works in theory, but A.K.I. can delay it — better to win the read with a damage-payoff option
The clip below records:
- HK → 2PP→K
- HK → 2PP→LPLK
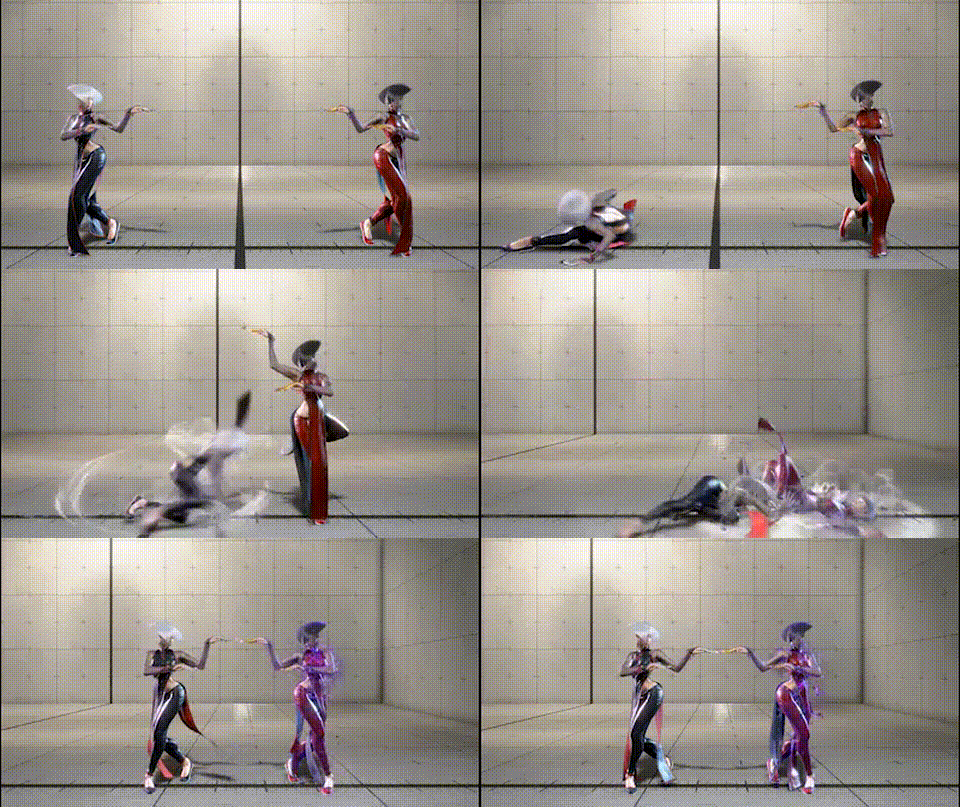
A.K.I. is -25 on block.
Recommended counters
Punishable — any 5–6F move confirms reliably. Don't hesitate to take the guaranteed punish on block.
A.K.I. is +20 after the throw. Two main oki routes:
- Drive Rush meaty (used vs characters who can't go through projectiles)
- Neutral tech removes the shimmy option from her kit
- 214LP → Drive Rush (used vs characters without projectile invulnerability)
- Covers both in-place tech and back tech, making this her strongest oki option
Recommended counters
- vs Drive Rush oki: this becomes a mix-up read. Neutral tech removes shimmy; avoid back tech carelessly
- If A.K.I. stops at LP to shimmy, a shimmy counter is possible — keep that read in mind
- vs 214LP confirmed DI:
- In-place tech + Drive Impact punishes 214LP on reaction (1F late and it's too slow)
- Buffer DI on wakeup — it hits 214LP on sight; if A.K.I. uses Drive Rush instead, the flash clears the input automatically
Also watch for 214LP confirm into projectile invulnerable moves on in-place tech:
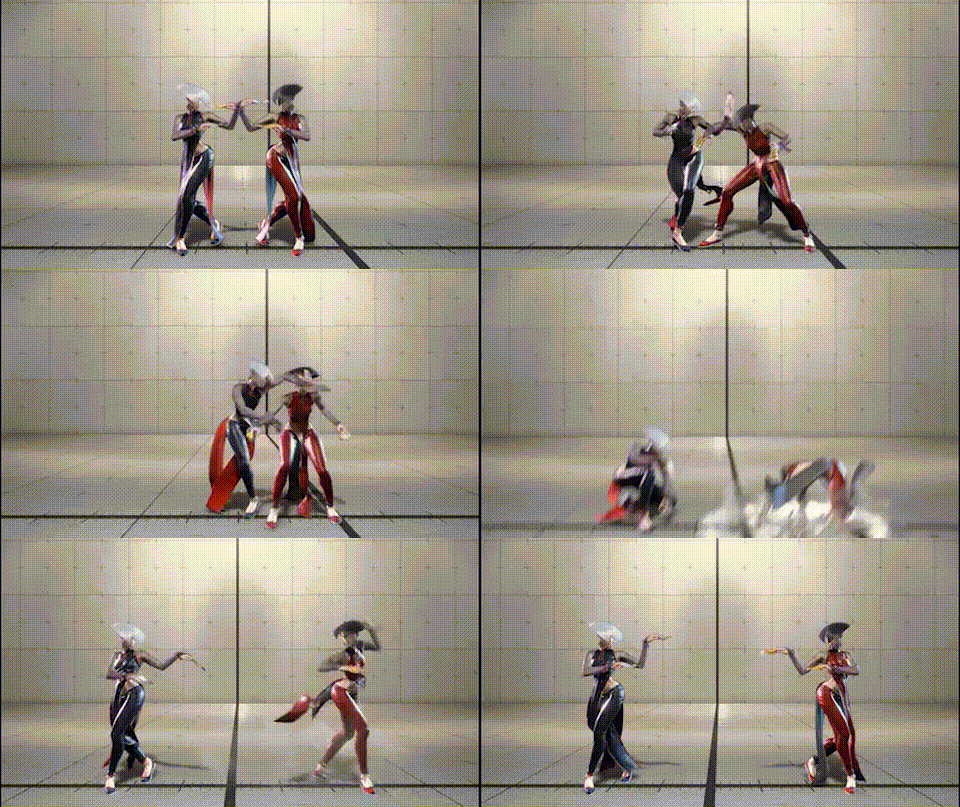
A.K.I. is +19 after the throw. Main oki routes:
- Drive Rush meaty (vs characters who can go through projectiles)
- Neutral tech makes shimmy impossible for A.K.I.
- 214LP → Drive Rush (vs characters without projectile invulnerability)
- Covers both in-place tech and back tech — A.K.I.'s strongest oki route
In-place tech is the safest general answer. It removes the walk shimmy from her options, and if she goes 214LP → Drive Rush you can hit Drive Impact on reaction. Back tech carelessly is the worst outcome.
Recommended counters
Default to in-place tech:
- A.K.I. can't walk shimmy if you tech in place
- If she used 214LP, the fastest Drive Impact confirms on reaction (1F late = too slow; buffer DI on wakeup)
- Buffer DI on wakeup: hits 214LP on sight; A.K.I.'s Drive Rush flash clears the input so no check needed
214LP (OD 214PP) situation: if 214PP hits, or if she does nothing and DI leaks, accept the reset — confirm 214LP visually and DI properly when you can.
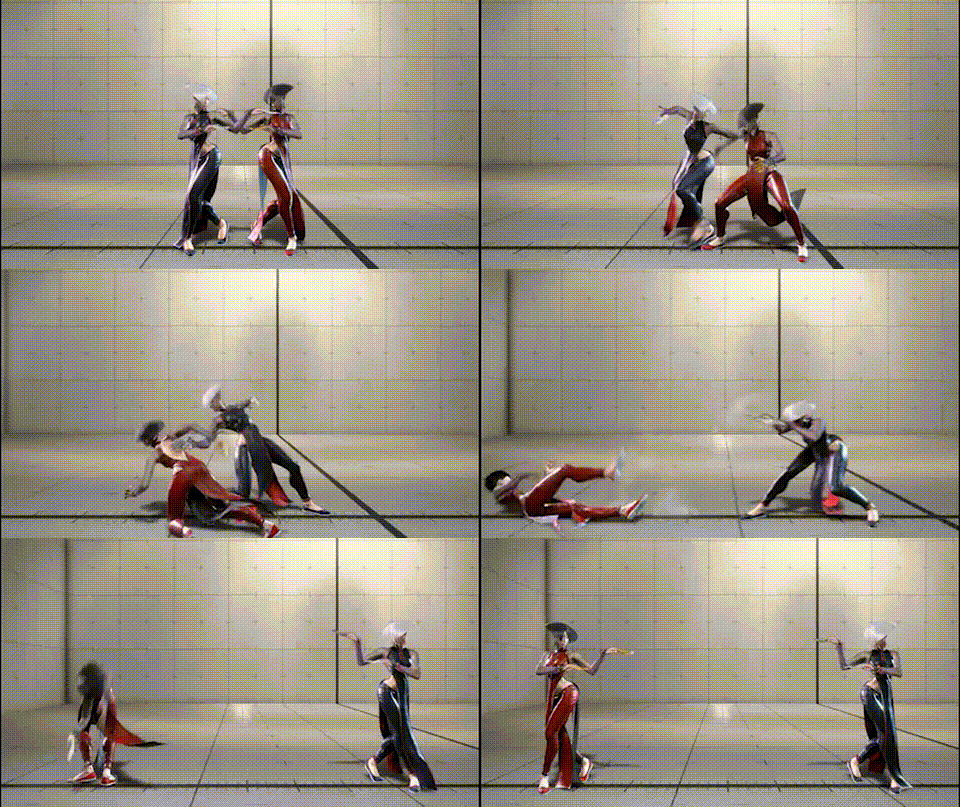
The clip below records:
- Throw → raw Drive Rush → 2MK
- Throw → 214LP