
リュウ
Ryu — 对策
Key Info
- Sustained overhead with combo available: 6MP
- Defense
- OD invincible reversal at 6F startup: 623PP
- If you play Luke or Kimberly, hold off on Drive Rush after a throw
- Anti-air invincible at 5F startup: 623LP
- SA1 (236236P): 7F startup, no projectile invincibility
- SA2 (214214P): 12F startup, no projectile invincibility
- SA3 (236236K): 5F startup
- OD invincible reversal at 6F startup: 623PP
- Plus-on-block moves
- 6HP: +3F
- 214HP: +2F
- (Denjin Renki) 214P: +3F
Neutral Game (Focus Points)
- Dealing with 236P (Hadoken)
- Do not reversal jump after blocking — Ryu may be watching for jumps and the next fireball may already be a safe Hadoken
- If you land a Just Parry, feel free to jump as a follow-up
- Always buffer a heavy attack when you Parry so you can punish on a Just Parry
- If Ryu feints with 214LP, buffering on Just Parry becomes very difficult — if you cannot buffer reliably, the risk/reward does not add up, so just block
- Dealing with 214P (Hashogeki)
- 214HP is +2F for Ryu on block
- If you read 214HP and mash fastest mash, 214LP will beat you
- There is a large frame gap between 214LP and 214HP — you can fuzzy with a move that reaches
- Dealing with 6HP
- If you block it, Ryu is +3F and his pressure begins
- Depending on spacing, you can fuzzy to cover all options
- Accept throws in midscreen
- Ryu's forward and back throw in midscreen do not lead to strong oki
- Drive Rush oki does not connect either — just accept the throw and reset to neutral



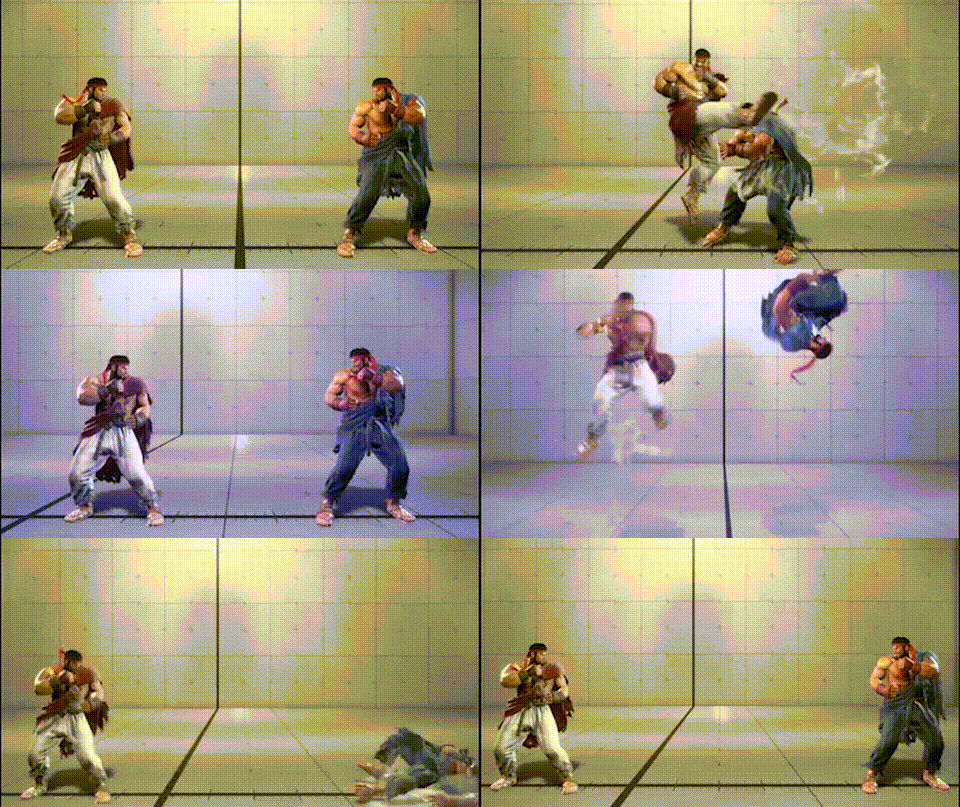
The slight arc change is designed to throw off anti-air timing. Choose the right anti-air for the situation.
Recommended counters
Anti-air selection
- Air-to-air (JLP / JMP): clean answer — Air Tatsumaki has no down hitbox, so attacking from above wins
- Early anti-air: time it to the regular jump and beat Tatsumaki before the spin starts
- Late anti-air: place a button at the landing point. Risky but high-reward
When used as a cross-up
The leg's reverse frame creates a cross-up hitbox.
- Just-parry attempts need both-side input
- Reversal SA / OD invincibility can break the mixup if you've eaten a few
- Don't reach for anti-air — wait until you're sure of the side
If the Ryu mixes empty-jump throws and this move into his safe-jumps, committing to an anti-air invincible or OD reversal beats every one of those options — keep it in your pocket:
Watch out: OD damage
OD Air Tatsumaki does 1.5× grounded OD damage. Big damage when it lands in a combo.
- In the corner it routes into SA3 — game-ending
- Used as a follow-up after 6HK or JMP anti-airs land
- After taking it, mix your wakeup so Ryu's oki is a guess

- (Denjin Charge) 214P
- Ryu is +3 on block
Counter Tips
Denjin Charge Hashogeki has improved block frames over the normal version. At +3, Ryu is advantaged — do NOT mash.
- +3 on block means Ryu wins both mash and throw-tech situations — focus on defense
- Confirm Denjin Charge activation and adjust your mental frame to the improved block values
- Denjin Charge expires over time — wait it out if needed before going back on offense
- (Denjin Charge) 214PP
- Ryu is +4 on block
Counter Tips
+4 on block means Ryu is heavily advantaged. Absolutely do NOT mash.
- At +4, Ryu beats both strike and throw — go fully defensive
- When Denjin Charge is active and you see the OD flash, consider turtling up or escaping with a forward jump
- Track Ryu's Drive Gauge — OD Hashogeki costs 2 bars
(Denjin Charge) Hadoken(电刃炼气)



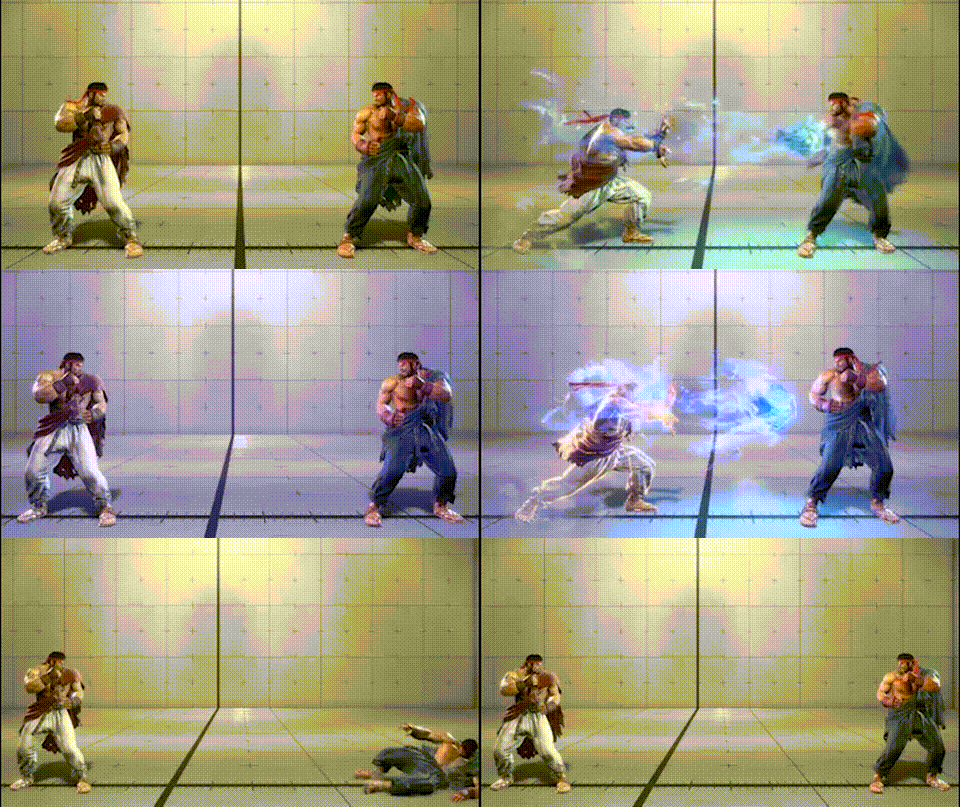
- (Denjin Charge) 236P
- Ryu is -1 on block
Counter Tips
Denjin Charge Hadoken is -1 on block — no punish available. Ryu will throw it much more freely in this state.
- No punish at -1. Use parry or jump over to close the gap
- Ryu's improved projectile safety means jumping in is riskier — stay alert for anti-airs while dealing with the fireball
- Waiting out the Denjin Charge expiration while staying patient is a valid defensive approach
- (Denjin Charge) 236PP
- Ryu is +2 on block
Counter Tips
+2 on block means Ryu is advantaged — do not mash or attempt throw-tech recklessly.
- +2 on block: no mashing. Guard and read Ryu's next action
- Denjin OD Hadoken costs 2 Drive bars — Ryu commits significant resources. Guard the follow-up pressure carefully
- Identify the OD flash to recognize you're in Ryu's advantage state and tighten your defense
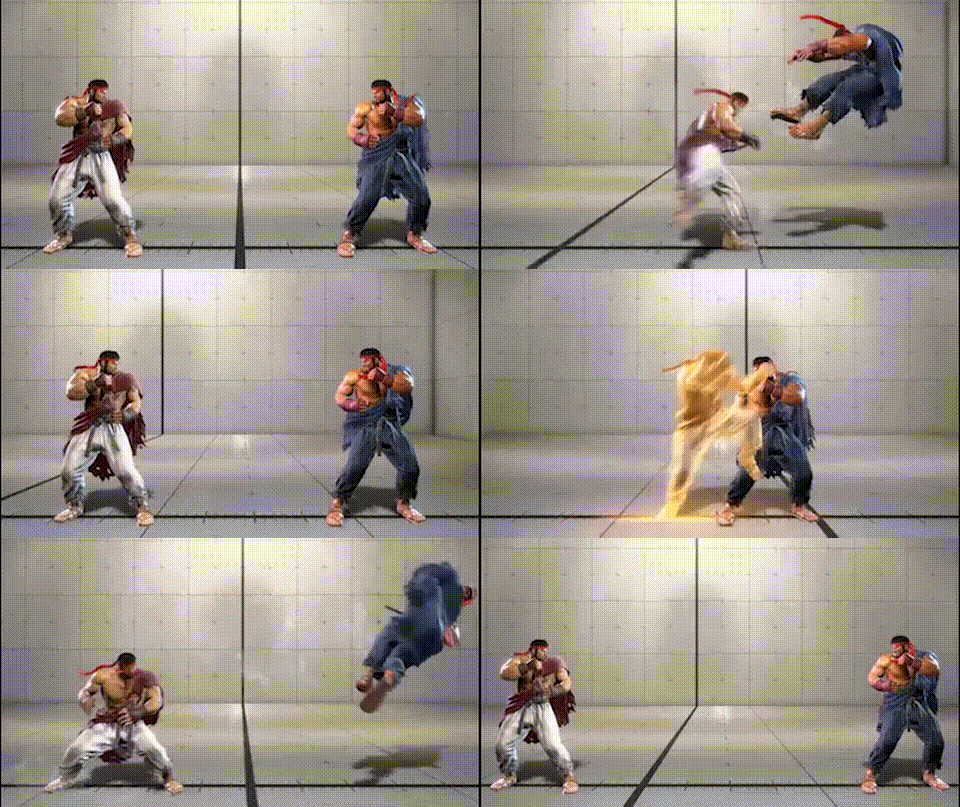
Used as a combo ender. On block, anything punishes it — go for the max damage combo.
Recommended counters
Always run the maximum punish:
- 214LK: heavy-starter max combo
- 214MK: heavy-starter max combo
- 214HK: heavy-starter max combo
- 214KK: max combo including SA
Drill these in training. Missing the punish is worse than blocking nothing.
6MP active-frame overhead after 214LK ground hit
- After a grounded 214LK, Ryu is +1 on block and can fish for a deep meaty 6MP overhead. If you don't recognize the animation, you eat it clean
- In the corner the overhead links into a full combo after a light-attack frame burn — be ready to just-parry
Watch out: fireball invincibility
It's easy to forget Tatsumaki ducks fireballs.
- A long-range late hit confirms into 623HP — possibly killing you
- During Burnout, Tatsumaki chip can close out a round
- When your zoning is being read, switch to Hadoken feints (214LP) or close space — don't sit still
How to make Ryu not throw it
Ryu doesn't want to throw raw Tatsumaki — it's punishable on block and reactable.
- Throw fireballs only with the Tatsumaki read in mind: safe-fireball, mix in DI threats
- Have your max punish from -13 / -15 ready in muscle memory
- 214LP
- Ryu -3F on block
- 214MP
- Ryu -6F on block
- 214HP
- Ryu +2F on block
- 214PP
- Ryu +3F on block
- (Denjin Charge) 214P
- Ryu +3F on block
- (Denjin Charge) 214PP
- Ryu +4F on block
Recommended counters
- 2LP→LP→2LP→214P pressure string
- A 4F button whiffs here — use a move that actually reaches the opponent to fuzzy guard.
- Drive Impact also works as a fuzzy option, but carries risk of being countered if Ryu does nothing.
The video below records 214LP and 214HP so you can compare the frame gaps.
- HP→214P
- Everything except 214HP is a true blockstring, so Drive Impact the moment you see the Hasshoken motion.
- If Ryu has SA3 stocked, he may cancel into it — jump the instant you see HP to make it a guessing game.
- With practice you can react comfortably.
- 214P lockdown
- While you're burned out, a blocked 214LP leaves Ryu at +1, so 214P lockdown becomes powerful.
- Watch the spacing — once Ryu is at a range where only his LK reaches, press a 4F button to trade.
- Rule of thumb: the timing after you've blocked two 214Ps.
- 214HP re-pressure
- Ryu may also use 214HP to re-close the distance, locking you down again and worsening your gauge situation.
- Press a long-reach button at the timing you would block the 214LP to go for the reward.
It's difficult, but the ideal is to combine all of these responses:
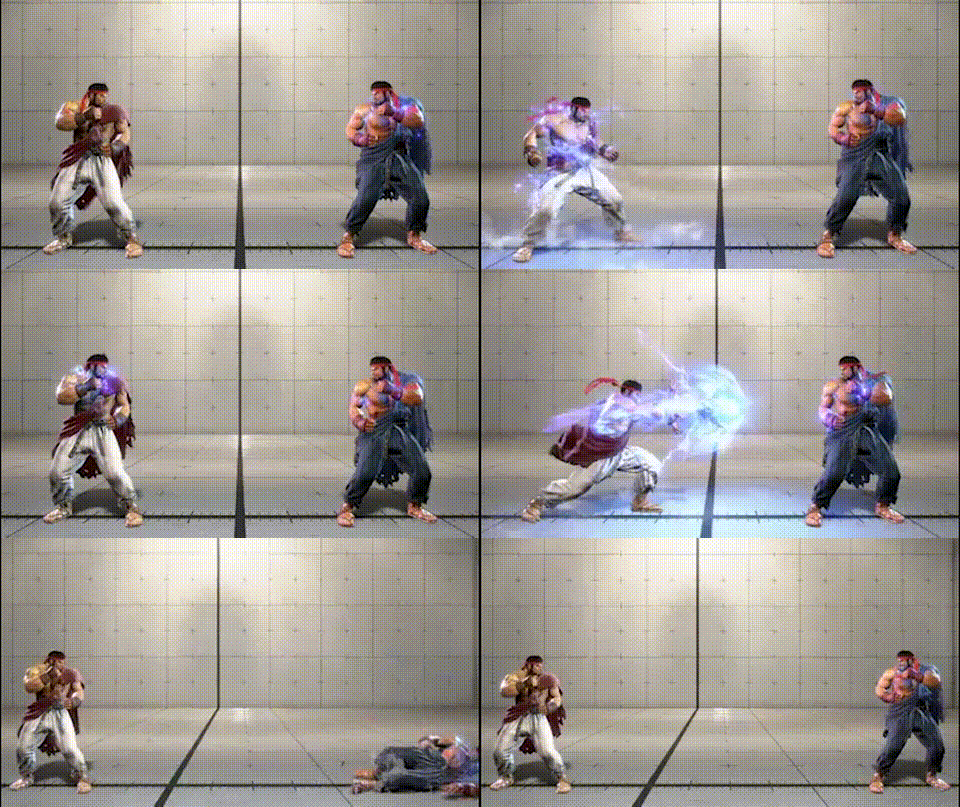
Denjin Charge has 52F of total animation — pure recovery. Either deny the stock or capitalize as soon as it's used.
Recommended counters
Denying the stock
- Don't sit still after a knockdown — Ryu wants you to. Push off wakeup or run a setup that forces him to defend
- Watch for the 22P motion right after a Hadoken's recovery — punish hard
- During 22P, Ryu is completely defenseless. DI, jump-in, SA, drive-rush — go for max reward
Once it's stocked
- Always check the Denjin icon under his HP bar
- Block frames, combo damage, every read shifts. Adjust accordingly
- Number-one threats: 214HP (links from normals) and OD 214PP (+4 on block)
New block-frame numbers
- Denjin 214HP: +3 on block
- Denjin 214PP: +4 on block
- Denjin 236HP: 2-hit fast fireball
→ Mash punishes lose to Denjin H Hashogeki re-pressure. Have a plan: backstep, jump, reversal — don't just sit and block.
Drain the stock and reset
Denjin is one stock, no overlap.
- Play patient until Ryu spends it
- The frame after he consumes Denjin (e.g., after Denjin H Hashogeki), he's "stockless" and weaker
- Make Denjin consumption part of your round plan to cap his damage ceiling
Watch out: Denjin lethal
Denjin combos hit much harder than baseline.
- A corner stray = round
- Drive-rush 2MK → Denjin H Hashogeki on hit takes 60%+
- When low on health, prioritize block over offense while Denjin is up

Used in combo enders and 2MK confirms. 236MK has 8F-reach punishes — find the route on your character.
Recommended counters
236LK
- Heavy-attack starter for max combo
- If only mid/light reaches, take the best version available
236MK
- Use an 8F-reach button: Luke 2HP, Ken 4HP, Cammy M Cannon Spike, etc.
- Drill your "8F punish" combo in training
Especially with 2MK → 236MK, a tip-range 2MK makes short punishes whiff — this string needs per-character homework. If you never threaten it, it becomes a free auto-pilot knockdown string, so research your own character's 8F punish:
236HK
- 27F startup → parry it on read, even if you miss the just-parry
- Lucky just-parry = instant heavy combo
- Block is -3 only, so it's not punishable, but distance kills the follow-up
236KK
- Used for damage when the routing is correct, but Ryu fumbling it leaves -18
- Heavy-starter max combo
Safe-jump after 236LK
- After a 236LK knockdown Ryu can set up a safe jump. When you see his jump, decide whether to risk a reversal — if it's a safe jump, the reversal will be blocked and punished
How to make Ryu not throw it
Ryu doesn't want raw 236K — punish frames are too steep.
- Most appearances are 2MK cancels — control the 2MK range or stay outside it
- H 236HK at 27F is parry food; if Ryu starts mashing it on a turtle, parry-bait
- OD is combo-only in practice
Speed and recovery change with strength, so you have to read which one is coming. Block / parry / jump / fireball-invincible / DI — all answers exist; pick the right one.
Recommended counters
236LP
- If you parry, buffer a jump — opponents who safe-fireball usually input the next Hadoken on autopilot
- After blocking, the next Hadoken is often a safe fireball — once you block a slow projectile, do not jump next
236MP
- Same answers as L Hadoken. Treat the medium speed as a tell that another fireball is loading
236HP
- At close range, parry with a heavy attack or raw drive-rush buffered
- At long range, parry with a forward attack to capitalize on safe fireballs
Watch out: 214LP feint
Ryu can feint a Hadoken with 214LP to bait parries.
- Sometimes "block only, no parry" is the right call
- If you parry to close distance, buffer a forward dash to cancel the parry on whiff
- Without a confirmed reward (just-parry → heavy / just-parry → jump), the risk-reward of parrying does not justify it; just block
An easy way to put risk on the 214LP feint without parrying: buffer a heavy attack at the timing you would block the 236P — highly effective:
Mind your drive gauge
Hadokens chip a lot of drive. Don't let yourself be slowly bled into Burnout — mix in jumps, drive-parry, and drive-rush to close space. Burnout against Ryu is lethal because of the 22P pressure routes.
Fireball-invincible characters
- Rashid Spinning Mixer (OD), Cammy Hooligan, Juri Fuhajin etc. can flatly beat Hadoken on read
- Don't spam the answer — Ryu will start throwing them only when you commit


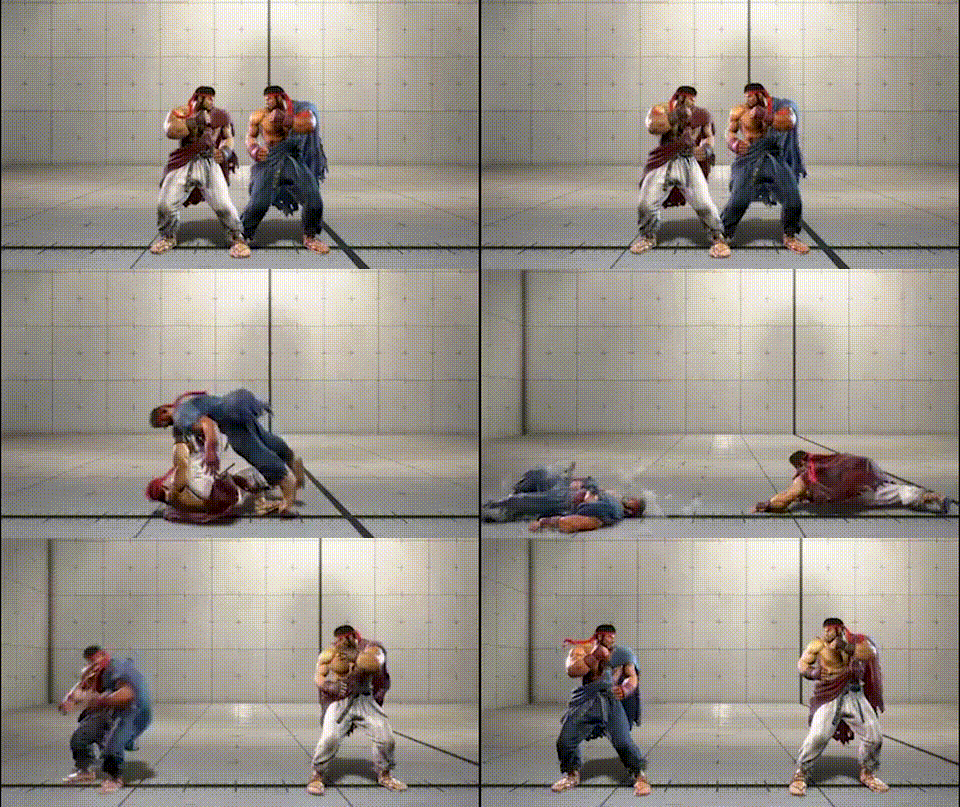
Ryu is at +11F after this throw.
- Without Drive Rush, he gets no oki
- The spacing is wide, so his strikes can only be meaty by 4F
- Mashing a 4F button at the earliest timing trades, and no combo exists afterward
- To punish that 4F mash, Ryu has the option of a Hashogeki feint
- it turns into a combo on counter-hit
Conclusion (recommended counters)
- Recover in place, and if you see Drive Rush, answer with an invincible reversal that has strong horizontal reach
- Anything with 13F startup or faster is guaranteed, so check what your own character has
- An invincible reversal without strong horizontal reach risks being whiffed by the throw

Punishing a blocked Shoryuken is one of the highest-reward defensive plays in SF6.
Recommended counters
Punish chart
- L blocked (-23): full normal combo + special
- M blocked (-32): SA-tier punishes available on many casts
- H blocked (-36): max combo on every character
- OD blocked (-40): full SA3 punishes — take the round
Drill your maximum punish from -23 / -32 / -36 / -40 in training. Muscle memory is the difference between -23 punish and missing the input.
After 623HP hits you
- Ryu has trouble landing meaty throws after H Shoryuken
- Mash a fast button or attempt just-parry — it's plus EV here
- Watch for 6MP active-frame overhead: from H Shoryuken on-ground hit (Ryu -1 on block), Ryu can fish for a deep meaty 6MP. Visual recognition matters — if you don't know the animation you eat it clean
The clip below shows the 6MP overhead landing as a meaty after a grounded 623HP:
After 623PP (OD) hits you
- Ryu can run oki even mid-screen
- Quick-rise blocks Ryu's drive-rush shimmy. Remember it — it's easy to forget
Ryu can stop the rush short with 2LP, but if you took a back-rise there is no oki at all:
Mid-screen, just take the throw. Ryu's mid-screen throw oki is weak.
Defending the wake-up after Shoryuken enders (LPLK situation)
The wake-up that follows 623HP / OD Shoryuken combo enders puts Ryu at +19F (the LPLK situation) — his main offensive starting point. Your best option depends on what your character has access to:
① Characters with a 7F-or-faster invincible SA with a wide horizontal hitbox
Examples: Luke SA1, Manon SA2, Rashid / Cammy OD invincibles.
- Back-rise → confirm Ryu's drive rush → fire the SA
- Beats both strikes and the throws Ryu uses to bait OD reversals
② Characters with a 7F-or-faster OD invincible but no wide hitbox
- Quick-rise → confirm drive rush → OD invincible
- Quick-rise specifically blocks Ryu's shimmy, so this option covers his entire drive-rush oki tree
③ Characters without a reversal
- Mix between quick-rise → confirm rush → delay-tech, and back-rise
- Back-rise is great as a passive option: with no rush, Ryu has no oki at all from this distance
⚠ Watch for super-flash counters: when going for a wide-hitbox SA, Ryu can SA-counter you during the freeze if he has meter. Always check his SA gauge before committing.
How not to feed it
The better Ryu's anti-airs are, the more disciplined you have to be on the ground.
- Early jumps: lose to pre-emptive H Shoryuken
- Late jumps: lose to L Shoryuken's 5F startup
- Answer: jump rarely. Win neutral on the ground; jump only when his anti-air discipline lapses
Don't over-fear OD reversal
OD Shoryuken is great as a reversal but -40 on block. Building your entire offense around "what if he OD's" lets Ryu lock you out of pressure.
- Luke / Kimberly etc., whose drive-rush after throw is strongest, should hold drive-rush meaty until they confirm Ryu isn't waking with reversal
- Throws don't whiff Shoryuken, so shimmy mind-games are weaker than usual here

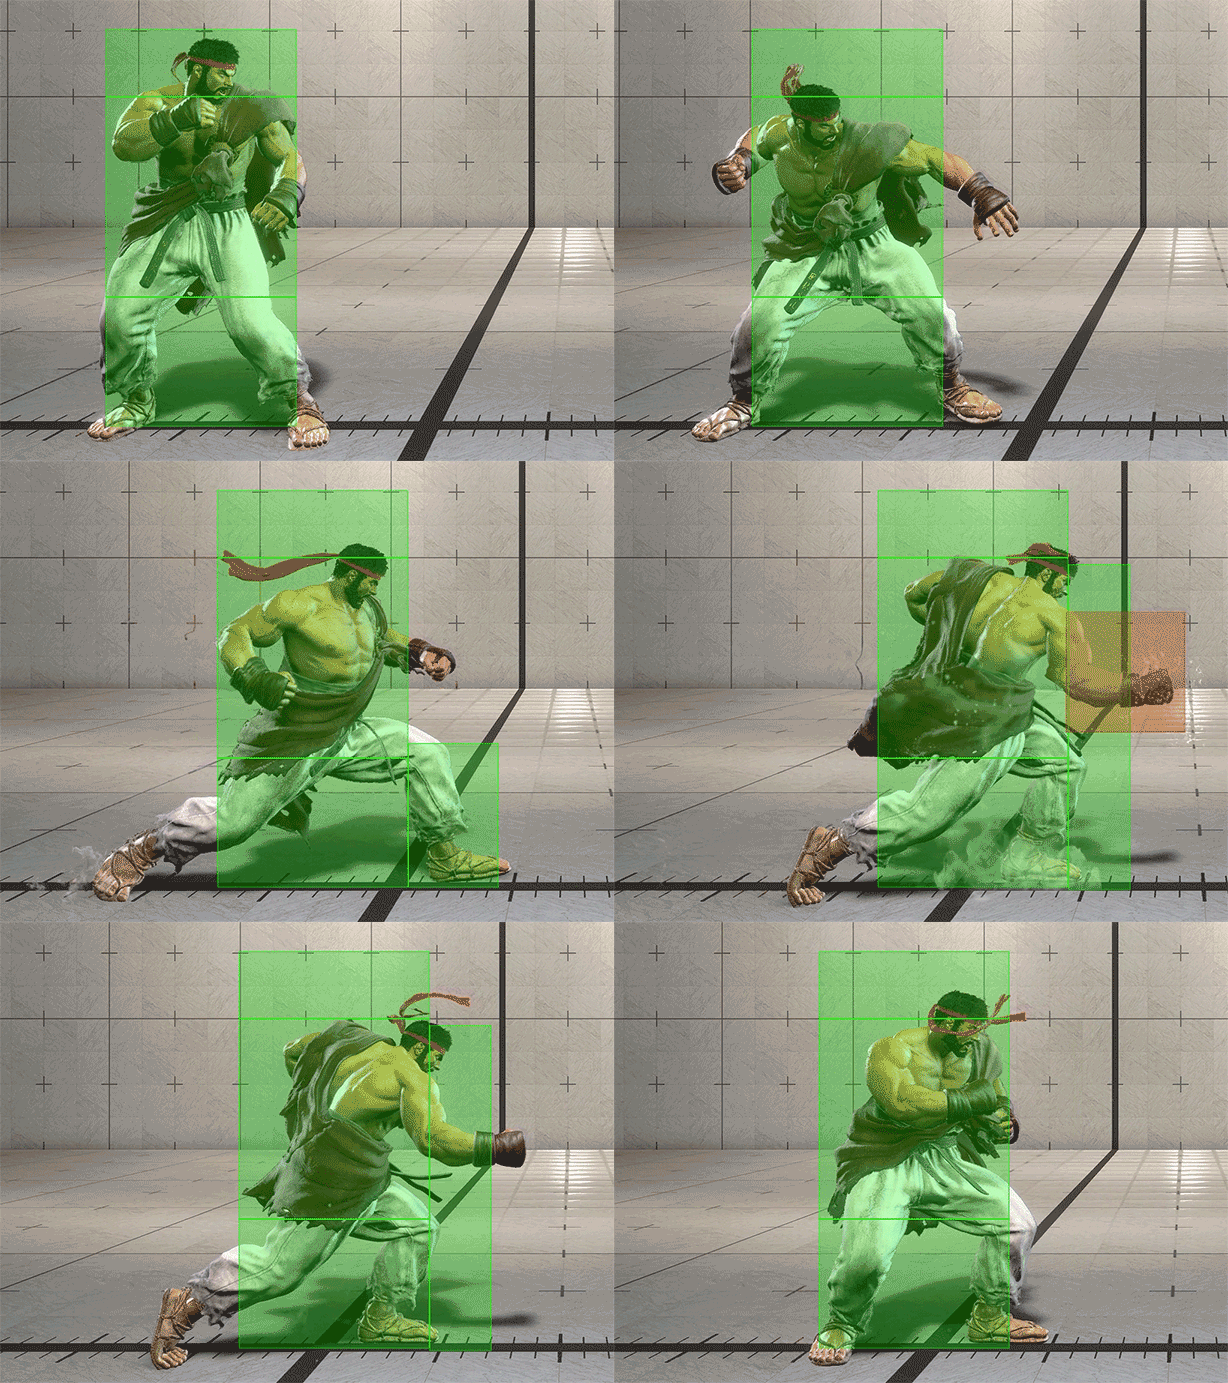
A normal that leaves Ryu at +3F on block.
Against a Ryu who keeps swinging 6HP, placing the occasional neutral jump is the counter.
Recommended counters
Even with neutral jumps placed, you will still end up blocking it often.
Ryu's main options after a blocked 6HP are as follows:
- 6HP
- a rip-off running from +3F; the Drive-gauge gap keeps widening
- MP
- crushes mashing
- 2MK
- the standard follow-up from 2MK is a cancel Drive Rush
- 2MK is 8F, so a 4F mash is possible
- walk-up throw
- depending on the spacing he has to walk a fair bit, so be extra careful when you have blocked 6HP several times in a row
The rip-offs you must not eat are 6HP and the walk-up throw.
These two leave a gap of roughly 12~20F.
To punish those rip-offs, the recommended answer is a fuzzy jab — press a 4F button at the timing where you would block 2MK.
The video below records each of these options:
Once that fuzzy is punishing the rip-offs, Ryu will more often go for Drive-gauge chip such as MP→LK→HK or 2MP→236P.
In that case check his Drive gauge — if it is at 3 bars or less, Drive Impact also becomes an option.
If he has 3 bars or more and you go for Drive Impact, it gets countered when his choice was a cancel Drive Rush from 2MP.

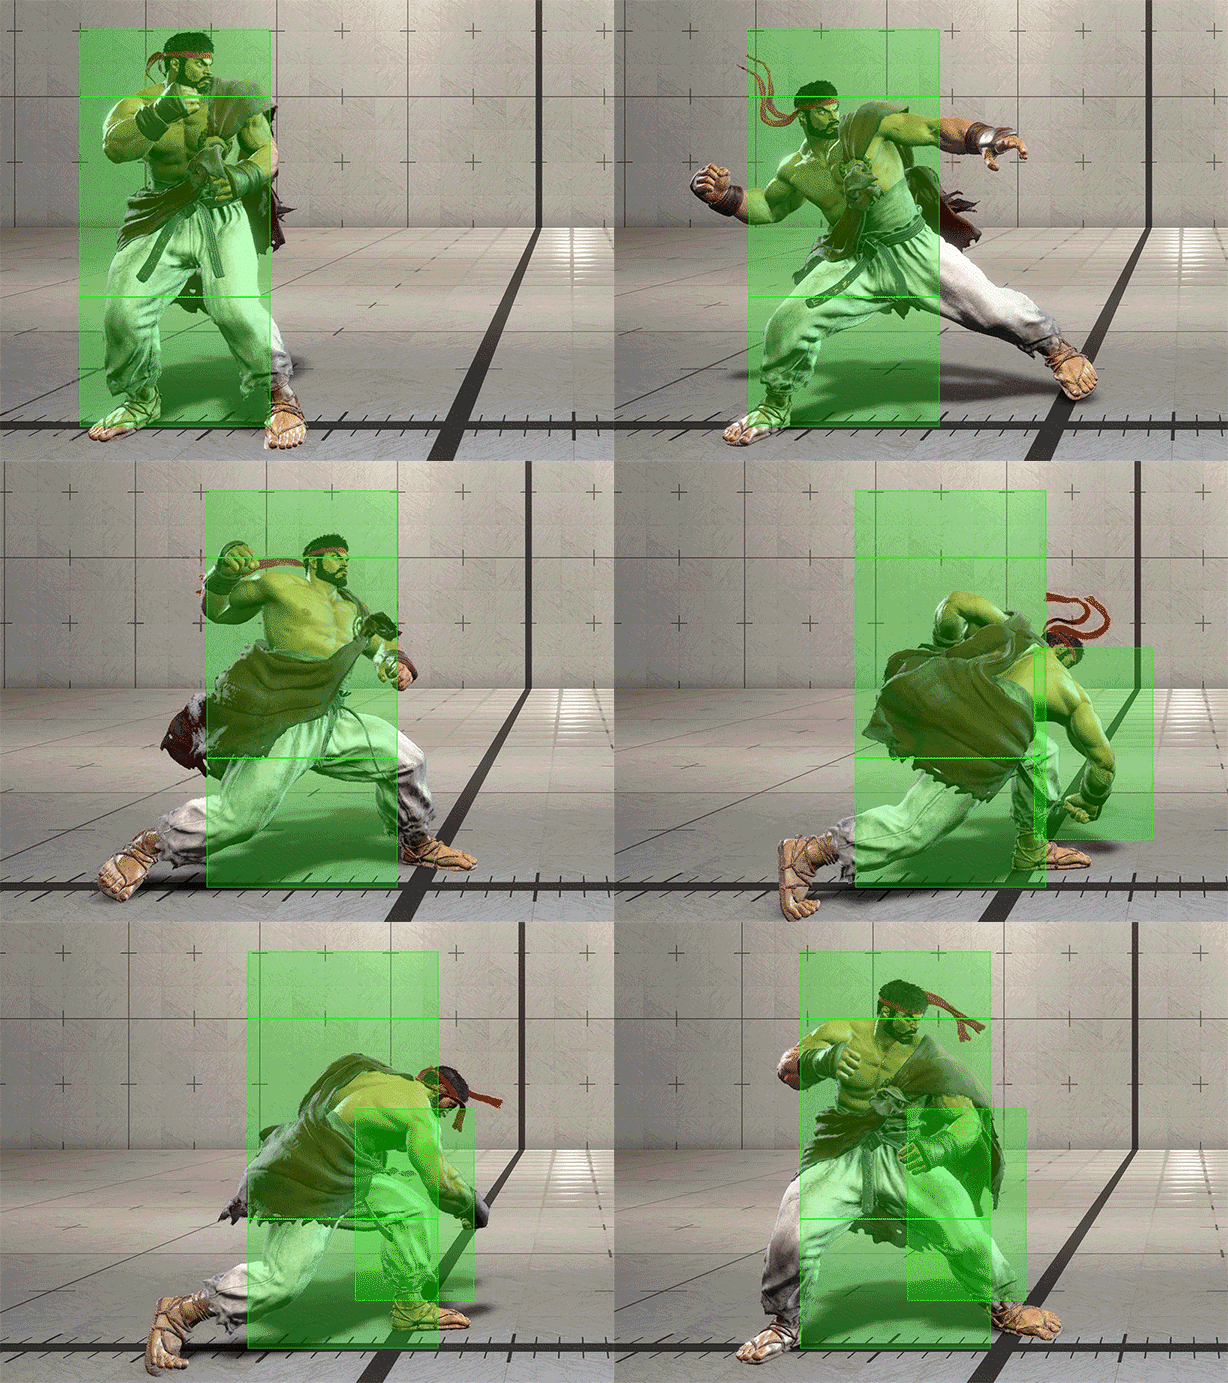
Ryu's overhead.
In the corner, it combos when landed with late active frames after a light-attack frame kill.
Learn the setups at least by sight and go for the just parry.
Unlike other characters' overheads, Ryu's is only -1 on block, so remember that when he makes you block it with late active frames it becomes +1.
Recommended counters
After a grounded 214LK hit (Ryu is +1F when you block the meaty overhead)
After a grounded 623HP hit (Ryu is -1F when you block it)

Ryu is at +19F after this throw.
- If you recover in place
- When Ryu has used Drive Rush, an OD reversal with 7F startup or faster is guaranteed
- Drive Rush→2LP is a safe meaty against 8F reversals
- When Ryu has used Drive Rush, an OD reversal with 7F startup or faster is guaranteed
- If you take backward recovery
- Ryu can make your OD reversal whiff by throwing
- Characters with a 7F-startup SA that reaches far horizontally can deny the oki completely
- e.g. Luke's SA1 or Manon's SA2
Conclusion (recommended counters)
- If your character has an invincible move with 7F startup or faster and strong horizontal reach
- backward recovery → confirm the Drive Rush → activate the SA
- e.g. Luke's SA1, Manon's SA2, Rashid's OD reversal, Cammy's OD reversal
- If your character's OD reversal is 7F or faster but lacks horizontal reach
- recover in place → confirm the Drive Rush → OD reversal
- With no invincible reversal, mix between the following two
- recover in place → confirm the Drive Rush → delayed tech
- recovering in place makes the shimmy impossible
- backward recovery
- if he has not used Drive Rush, he gets no oki
- recover in place → confirm the Drive Rush → delayed tech
Watch out
Firing a 7F-or-faster SA with strong horizontal reach carries the risk of being punished through the super flash, so check the gauges before choosing it.