

キンバリー
Kimberly — 对策
Key Info
- Overhead that leads to combos on hit
- 4HK (+4F on hit)
- Defense
- No OD reversal
- 214KK: 6F startup, anti-air invincible
- 236236K: 10F startup, not projectile-invincible
- 214214P: 13F startup (combo-only — not relevant for defense)
- After hit animation ends, forward step in 4F allows shimmy
- 236236P: 8F startup
- After hit animation ends, Kimberly's damage and movement speed increase by 1.1x
- Moves that are plus on block
- HK
- 2MK
- 236K→LK
Neutral Game (Focus Points)
- Dealing with 3MK
- Do not maintain spacing where it cannot be punished
- At round-start distance 3MK is generally not punishable — stay closer so you can threaten a punish
- Dealing with the elbow drop (jump 2MP)
- Do not stay at distances where the feint is easy (round-start distance is ideal for the feint)
- At feint-friendly distances, use a normal with upper-diagonal hitbox to cover both the elbow drop and forward jump
- If you lack such a normal, use regular normals as your primary anti-air
- Dealing with post-throw situations
- On in-place wakeup against Raw Rush, OD reversal is guaranteed
- Without OD reversal, any SA with 8F or faster startup confirms unless super flash countered
- Understanding the 236K mixup
- 236K canceled from normals other than MP and heavies can be stopped with c.LP
- When canceled from MP or heavies, hold c.LP mash or do nothing as your options
- Doing nothing leads to the Kouku mixup — the risk-reward is easier to manage after Kouku, so doing nothing on 236K reaction is recommended
- Understanding the post-Kouku mixup
- You only need three options:
- Do nothing (Bushin Senpukyaku is punishable on block)
- Backdash (dodge Bushin Izuna Drop and punish)
- Fastest Rush → medium attack (punish Kimberly's jump-reading Rush)
- Jumping is the worst option — Raw Rush will pick you up into a combo
- You only need three options:
- Dealing with Saichimusou (214P teleport)
- 214P: normal version appears from the side at ground level
- 214PP: OD version appears from above
- When you see the smoke, delay slightly and place a normal with upward hitbox — covers both versions
- Dealing with Rush
- Do not create distance — stop Rush at close range
- Kimberly's heavily-used Rush → 2MK is punishable with Drive Impact — look for it
Nue Twister(跳跃中)(近身)




Counter-strategy for Nue Twister — punish frames, blocking direction, yomi paths — to be added.



Used off safe jumps and at frame advantage as a fuzzy crush or a tech punish.
- Fuzzy crush
- Tech punish
Recommended counters
Against the fuzzy crush
If you sense an empty-jump low or (前ジャンプ中に)214K coming off a safe jump,
keep OD reversals or anti-air-invincible reversals in your pocket as an answer.
It can also be fuzzied, so if your character has an invincible reversal whose final input can be completed standing, add it to your options.
Press the button at the timing where you would block the jump-in. In the video below, the following are recorded:
- (前ジャンプ中に)214K
- (ジャンプ中に)HK
Against the tech punish
Remember that a rising (前ジャンプ中に)214K whiffs entirely if you stay crouching.
Elbow Drop(前跳中)

A command normal that strengthens Kimberly's neutral. Jumping from mid-range lets her bait anti-air specials. Kimberly's jump alone creates a guessing game.
- Far jump: Prioritize anti-air normals with diagonal-upward hitboxes. Even if they whiff, the landing recovery is hard to punish.
- Close jump: Walking under is dangerous. Standing block is the safest option.
Recommended counters
- Choose your anti-air based on the jump distance
- Be aware that she may be baiting a parry — avoid pressing parry out of habit
- On block, frame advantage changes depending on your state:
- Standing: Kimberly is -1F
- Crouching: frame difference is 0F
- In both cases, press a 4F move at maximum speed
Even light normals can knock her out of the jump, so press one when you have the chance to get reward. Crouching light normals extend the window when used in this situation.
Bushin Hojin Kick(弧空中)


The strike branch from Arc Step. Kimberly is -8 on block, so a guaranteed punish is available.
Recommended counters
After blocking Arc Step, Bushin Hojin Kick gets blocked by sit-still and takes a -8F punish. Combine with back-dash to whiff-punish Bushin Izuna Otoshi, and Arc Step pressure becomes a clean two-way read. Never jump after Arc Step.
Hardcore option: fuzzy jump beats both branches
When Kimberly forces the Bushin Hojin / Bushin Izuna coin-flip, a 2-frame-window 10F~11F fuzzy jump covers both. Aim for the 11F window. Neither branch can be delayed, so if you can hit it cleanly, it's the perfect answer.
On hit, Arc Step cancels into Bushin Hojin Kick and grants oki — example of the quick-rise / back-rise situations:
Bushin Izuna Otoshi(弧空中)

The command-throw branch from Arc Step. Back-dash whiff-punishes it cleanly, so Arc Step defense becomes a clean two-way read.
Recommended counters
After blocking Arc Step, Bushin Izuna Otoshi loses to back-dash → punish whatever you can connect. Combined with sit-still (which beats the strike Bushin Hojin Kick at -8 on block), you have full coverage. Never jump after Arc Step — raw drive rush catches it into a full combo.
Hardcore option: fuzzy jump beats both branches
When Kimberly forces the Bushin Izuna / Bushin Hojin coin-flip, a 2-frame-window 10F~11F fuzzy jump covers both. Aim for the 11F window. Neither branch can be delayed, so if you can hit it cleanly, it's the perfect answer.

Normal versions
- 214LK (Light Bushin Senpukyaku)
- Kimberly is -30F on block — full-combo punish available
- 214MK (Medium Bushin Senpukyaku)
- Kimberly is -32F on block — full-combo punish available
- 214HK (Heavy Bushin Senpukyaku)
- Kimberly is -35F on block — full-combo punish available
OD version
- 214KK (OD Bushin Senpukyaku)
- Kimberly is -40F on block — maximum punish opportunity
Recommended counters
All versions of Bushin Senpukyaku are massively negative on block — always punish on a successful guard.
- Light / Medium / Heavy (214LK / MK / HK): -30F or worse — punish with a full heavy combo
- OD version (214KK): -40F — go for your biggest punish combo
Kimberly often uses this alongside projectiles, so stay grounded, block it, and take your punish rather than jumping over the setup.
When it's used for oki, routes like 2LP → 2MK often safe-jump Drive Reversal — not unique to this move, but remember that Drive Reversal is a low-quality read in the Kimberly matchup:

Kimberly's teleport special move.
- 214P: Normal version — appears from the ground directly in front
- 214PP: OD version — drops in from above in front
There is no need to distinguish between 214P and 214PP. When you see the smoke, wait a moment then place a normal move with upward hitbox coverage — this handles both variants. Practice the timing in training mode.

There are many patterns — focus on the universal answer first.
The right options depend on how the bomb was set. Key timing difference:
- 236KK → 236K → LK → 22P: up to 12F window — shimmy is possible
- MP → HP → 236K → MK → 22P: up to 3F window — shimmy is impossible
Adjust your option select based on which combo Kimberly used before the bomb.
MP → HP → 236K → MK → 22P (3F set)
A common route. Meaty +3 on wakeup, shimmy impossible. Options are chip/throw/mid/low. In ranked, OD invincible is the simplified answer (accept the risk of losing to bait). Watch for Kimberly forward-jumping and pre-walk if you see it coming.
MP → HP → 236KK → 236K → LK → 22P (shimmy possible)
OD-spent variant, shimmy becomes possible. Options are chip/throw/mid/low.
Recommended counters
Drive Gauge chip is the real lose condition — unless it's a kill, hold parry and fish for just-parry. Throws here aren't very damaging. Folding in ranked is fine.
- MP → HP → 236K → MK → 22P (3F set, no shimmy)
- Force a coin flip: OD invincible or fast tech are both fine
- If Kimberly starts stuffing reversals, shift to just-parry
Strike and throw mix becomes the main read. SA invincible and just-parry are the top picks on wakeup.
Each character's SA invincible has different startup and active frames, so optimal punishes vary widely. When in doubt, blow through with invincible — Kimberly's practice level affects this significantly.
- MP → HP → 236KK → 236K → LK → 22P (shimmy possible)
- Hold off on OD invincible and throws
- Walk-throw and forward-jump are strong since Kimberly's delayed strike is the main threat
- Hold parry → fish for just-parry
- Throw damage is low enough to accept: punish-counter ~1800–2400, mid/low ~3000
- Chip is 2–4 Drive bars; held parry can recover ~3 bars
Keep in mind Kimberly can forward-jump 2MP as a reversal bait / throw whiff punish.
If you read the forward-jump 2MP coming, drop throw and forward-walk instead (fuzzy walk).
By walking forward on the same timing you'd guard Kimberly's MP, you can guard the strike while slipping under the forward-jump 2MP.
Watch out: OD invincible can hit but still let the bomb connect
After MP → HP → 236K → MK → 22P (3F set), some characters land their wake-up OD invincible cleanly but still get caught by the bomb. Check your character's OD invincible properties — using an SA invincible instead may be the right call.
◎ = combo possible, 〇 = bomb hits but no combo, × = bomb whiffs
| Character | LP | MP | HP | LP+MP | LP+HP | MP+HP | Notes |
|---|---|---|---|---|---|---|---|
| Luke | × | × | ◎ | × | ◎ | × | HP / LP+HP single-hit invincible trade; +39F after slide |
| Jamie | × | × | × | × | × | × | Bomb whiffs entirely |
| Juri | × | × | ◎ | × | ◎ | × | HP / LP+HP land; combo into Senpusha / light Ryodansatsu or rush cr.HP stretch |
| DJ | × | × | × | × | × | 〇 | MP+HP only; no combo — Kimberly Hidden Variable (214P) → cr.LP → cr.MK meaty cover |
| Cammy | 〇 | 〇 | 〇 | ◎ | 〇 | ◎ | All hit; LP/HP/LP+HP no combo; LP+MP / MP+HP into Hooligan starter |
| Ryu | 〇 | 〇 | 〇 | ◎ | 〇 | ◎ | All hit; LP/HP/LP+HP no combo; LP+MP / MP+HP into Doudoufuu starter |
| Honda | 〇 | × | 〇 | ◎ | × | ◎ | OD Bushin Senpukyaku only; LP+MP / MP+HP into Doudoufuu → OD command grab |
| Blanka | × | 〇 | 〇 | ◎ | × | ◎ | LP+MP / MP+HP into Doudoufuu → OD command grab route |
| Guile | × | 〇 | 〇 | × | 〇 | ◎ | Single-hit leaves +12 for Hidden Variable (214P); MP+HP into Doudoufuu → OD command grab |
| Ken | × | × | × | × | × | 〇 | OD Bushin Senpukyaku only; MP+HP single hit, no combo |
| Chun-Li | × | × | × | × | × | × | Bomb whiffs entirely |
| Rashid | × | × | × | × | × | × | Bomb whiffs entirely |
| Ed | × | × | × | × | 〇 | ◎ | MP+HP combo; LP+HP single-hit only |
| Akuma | × | × | × | × | × | × | Bomb whiffs entirely |
| Terry | 〇 | 〇 | 〇 | ◎ | 〇 | ◎ | All single-hit (+9F with step-step); LP+MP / MP+HP into Doudoufuu route |
| Mai | ◎ | × | × | ◎ | × | ◎ | LP combos with Kagesugi set; LP+MP / MP+HP into Doudoufuu |
| Elena | 〇 | 〇 | 〇 | ◎ | 〇 | ◎ | All single-hit (+12F); LP+MP / MP+HP into Doudoufuu |
| Sagat | × | × | × | × | × | × | Bomb whiffs entirely |

236K cancels from normals into a wide tree of follow-ups (Emergency Stop, Arc Step, Neck Hunter, Shadow Slide, Torso Cleaver), making it Kimberly's main pressure tool.
Recommended counters
The starter normal decides whether you can mash
Only the following starters lock you out of mash on 236K → Arc Step:
- HP
- 2HP
- MP
From any other starter (MK, LK, etc.) the follow-up isn't a real mix-up — just mash. The clip records a 4F 2LP as guard reversal against MK → 236K → Arc Step and LK → 236K → Arc Step.
Exceptions that beat your mash
- Exception 1: drive-rush MK-or-stronger normal → 236K → Arc Step (drive-rush 2MP and drive-rush light starters are still mashable)
Drive-rush MK → 236K → Arc Step recorded — the mash loses.
- Exception 2: MK → 236KK (2MP and other light starters are still mashable)
MK → 236KK → Arc Step recorded — the mash loses.
From HP / 2HP / MP starters, stay still
When the starter is HP / 2HP / MP, Arc Step beats your mash, so the read becomes Emergency-Stop-throw vs. Arc Step.
- Read the Emergency-Stop throw: max-punish with a 6F medium
- Read the HP / 2HP / MP → 236K → Arc Step: do nothing (mashing eats the kick)
- If she shows a delay option fishing for invincibles, use neutral jump
The clip records HP → 236K → Emergency Stop → throw:
Hardcore option
If you don't want to gamble at all, a 3-frame-window fuzzy jab beats both her fastest throw and the no-follow-up. It's hard, but worth knowing. Hit your button 3F–5F after blocking.


Normal version
- 236K→HK (Neck Hunter)
- Overhead attribute — cannot be blocked crouching
- Kimberly is -3F on block — slightly minus; difficult to punish
OD version
- 236KK→HK (OD Neck Hunter)
- Kimberly is -1F on block — nearly neutral
Recommended counters
- Neck Hunter is an overhead — stand-block is required; crouching will eat the hit
- On block it is -3F, so a reliable punish is difficult; hold block and watch the follow-up
- OD Neck Hunter is -1F — almost neutral; block and read the next action
- Be ready for the mix-up between Neck Hunter (overhead) and Shadow Slide (low) off Sprint


Normal version
- 236K→LK (Torso Cleaver)
- Kimberly is +1F on block — Kimberly is at advantage
OD version
- 236KK→LK (OD Torso Cleaver)
- Kimberly is +3F on block — Kimberly is at advantage
Recommended counters
- Torso Cleaver (236K→LK): +1F on block — Kimberly is at advantage; never mash; hold block and read the next action
- OD Torso Cleaver (236KK→LK): +3F — Kimberly has more advantage; do not attempt any offensive option; guard and anticipate her follow-up
- After blocking Torso Cleaver Kimberly maintains her turn, so prioritize defense and consider Drive Parry to protect your Drive Gauge


Normal version
- 236K→MK (Shadow Slide)
- Low attribute — cannot be blocked standing
- Kimberly is -12F on block — punishable with a 5–6F confirm
OD version
- 236KK→MK (OD Shadow Slide)
- Low attribute — cannot be blocked standing
- Kimberly is -10F on block — punishable with a 5–6F confirm
Recommended counters
- Shadow Slide (236K→MK) is a low — crouch-block is required; standing guard will eat the hit
- On block it is -12F — punish with any 5–6F confirm
- OD Shadow Slide (236KK→MK): -10F on block — also punishable with a 5–6F confirm
- When you see Sprint, prepare for the Neck Hunter (overhead) vs. Shadow Slide (low) mix-up and guard accordingly

236K → Emergency Stop is the feint that puts Kimberly in throw range from any cancel distance — her primary guard-break tool.
Recommended counters
Emergency Stop is mainly used for throw / delay-tech / back-dash → delay HP. From HP / 2HP / MP starters where Arc Step also beats your mash, read the Emergency-Stop throw and max-punish with a 6F medium. If you'd rather play safe, a 4F mash also works (and beats the delay-options that fish for invincibles).
The clip records HP → 236K → Emergency Stop → throw:
Drive Impact is sometimes useful but Emergency Stop counters it cleanly — don't go for it. If she shows a delay-option fishing for invincibles, neutral jump punishes it.
Hardcore option
If you don't want to gamble at all, a 3-frame-window fuzzy jab beats both her fastest throw and the no-follow-up. It's hard, but worth knowing. Hit your button 3F–5F after blocking.
Arc Step自动派生

Arc Step is the special that fires when 236K has no follow-up: Kimberly springs off your body and can then pick between command-throw (Bushin Izuna Otoshi), strike (Bushin Hojin Kick), or no follow-up.
Recommended counters (after blocking Arc Step)
After blocking Arc Step you only ever pick between two options. Never jump — Kimberly catches it with raw drive rush into a full combo.
- Sit still
- Back-dash (whiff Bushin Izuna Otoshi for a guaranteed punish)
If you sit still, watch for Kimberly's options:
- Raw drive rush — she's reading a neutral jump. Fuzzy a short-recovery medium
- Forward jump — could be elbow drop. Use a wide-hitbox anti-air (Heavy Shoryuken-class works against most setups)
The recommended default is fuzzy-medium → covered by anti-air. The clip records raw drive rush → 2MK / forward jump → 2MP / forward jump → j.HK:
Hardcore option: fuzzy jump beats both follow-ups
When Kimberly pure-mixes between Bushin Izuna Otoshi and Bushin Hojin Kick, a 2-frame-window 10F~11F fuzzy jump covers both. Aim for the 11F window. Neither follow-up can be delayed, so if you can execute it cleanly, it's the perfect answer.
The losing scenario you should remember: Kimberly skips the follow-up → raw drive rush → HK.
236P
Normal versions
- 236LP (Light Vagabond Edge)
- Kimberly is -4F on block — slightly disadvantaged; difficult to punish
- 236MP (Medium Vagabond Edge)
- Kimberly is -12F on block — punishable with a 5–6F confirm
- 236HP (Heavy Vagabond Edge)
- Kimberly is -12F on block — punishable with a 5–6F confirm
OD version
- 236PP (OD Vagabond Edge)
- Kimberly is -12F on block — punishable with a 5–6F confirm
Recommended counters
- Light Vagabond Edge (236LP): -4F — hold block; punishing is difficult
- Medium / Heavy / OD (236MP/HP/PP): all -12F — punish with any 5–6F confirm
Always take your punish on block. Also note: while you are burned out, 236LP lockdown can override every SA — keep SA out of your options there:

Holding the neutral position (round-start distance) against Kimberly is very weak. Stay at a range where you can punish Water Slicer Slide on block (-4 or more). This also makes stopping her Drive Rush easier and prevents you from being baited by Elbow Drop.
Recommended counters
Do not sit at round-start distance. Make sure to attach real risk to Water Slicer Slide.


After Kimberly's back throw, she is +8F. Drive Rush cannot bury anything from this distance. Back tech pushes your line back — avoid it. It is a reset situation, but Kimberly may push for continued pressure with raw Drive Rush, so confirm the rush and punish it.
Recommended counters
- Default is in-place tech → confirm Drive Rush → punish with medium or higher

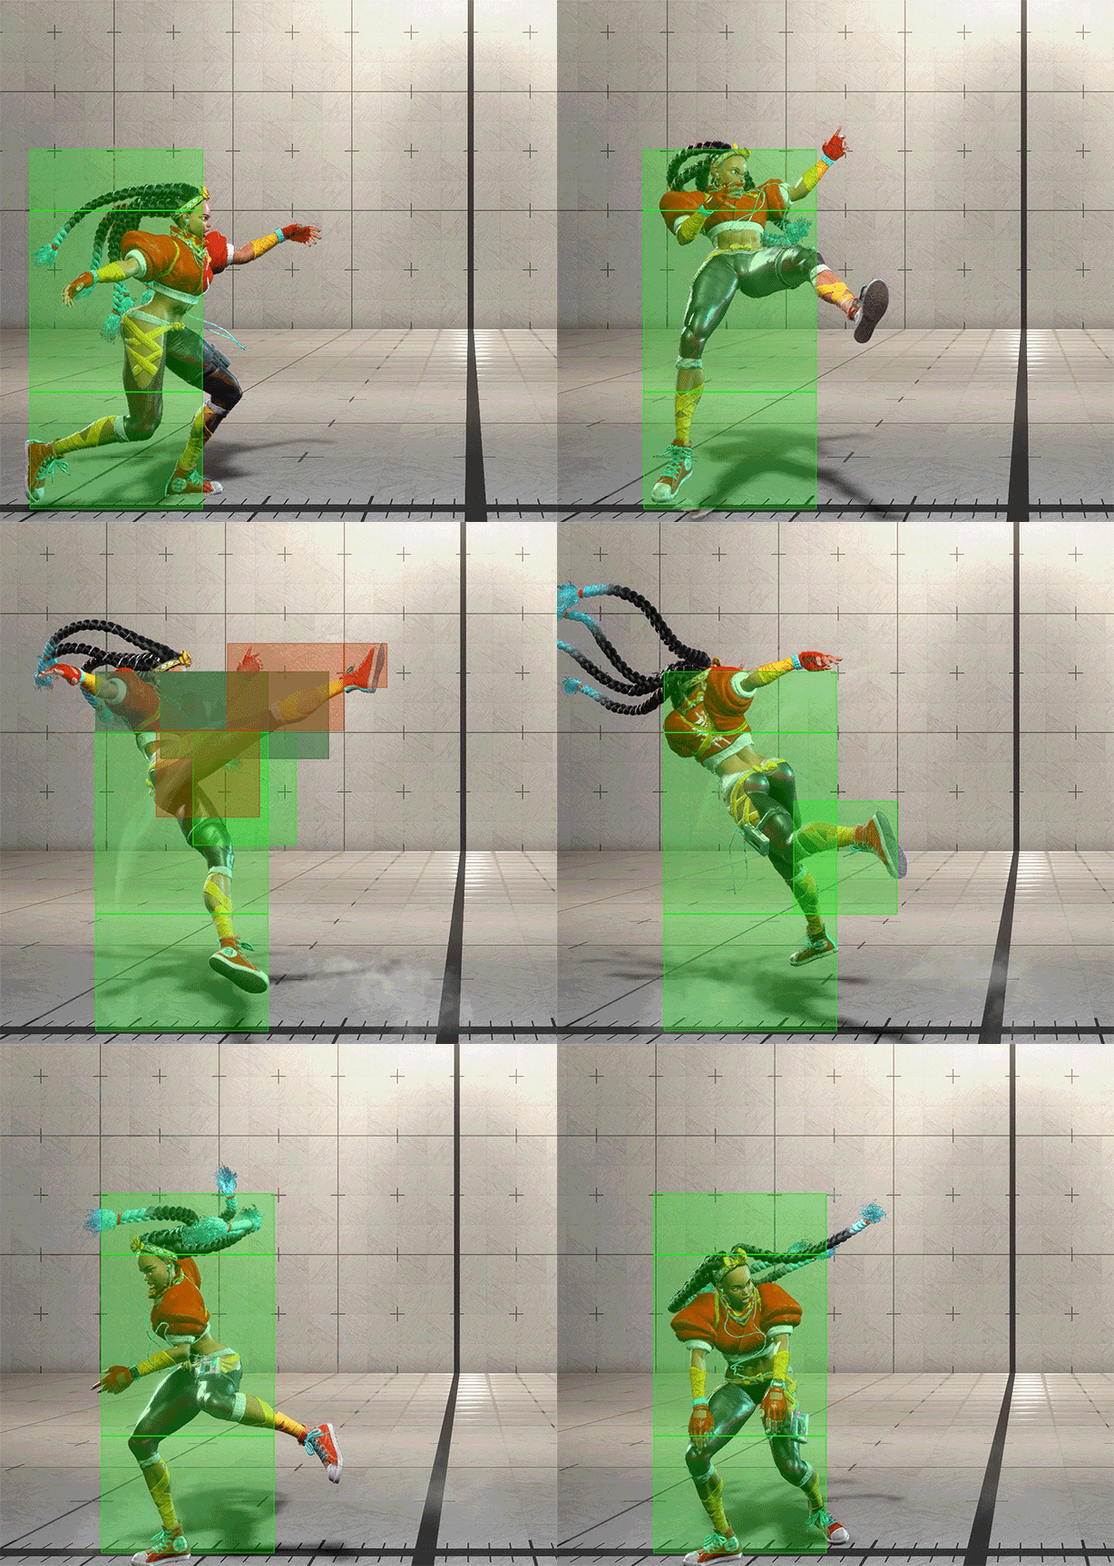
A forward-lunging kick that can be followed by Step Up (6HK→8). Depending on which side Kimberly jumps after, it can create a left/right mix-up.
Recommended counters
- Just Parry is the best answer when you see it coming
- If the Just Parry fails, a light normal with upward hitbox coverage can knock her down
Watch out
After a successful Just Parry, the follow-up is a ground-hit combo — don't forget to adjust. Heavy attacks with up to 13F startup are guaranteed.
On block, Kimberly is +2F but outside throw range. If you mash a 4F button the exchange becomes a trade. The following table shows Kimberly's trade combo by character — players who have not researched per-character trade combos are rare, so if your character's "Reachable move" column is not MP you can safely mash at maximum speed.
Manon and DJ in particular are highly vulnerable to maximum-speed 4F mash.
| Character | Advantage | Reachable move |
|---|---|---|
| Ryu | 9F | HP |
| Luke | 8F | MP |
| Jamie | 8F | MP |
| Chun-Li | 9F | HP |
| Guile | 8F | MK |
| Kimberly | 10F | HP |
| Juri | 8F | MP |
| Ken | 8F | MP |
| Blanka | 8F | MK |
| Dhalsim | 9F | HP |
| Honda | 8F | MP |
| DJ | 11F | HP |
| Manon | 7F | 214KK |
| Marisa | 9F | HP |
| JP | 7F | MP |
| Zangief | 9F | HP |
| Lily | 8F | MK |
| Cammy | 9F | HP |
| Rashid | 8F | MP |
| A.K.I. | 6F | MP |
| Ed | 8F | MP |
| Akuma | 8F | MP |
| Bison | 8F | MP |
| Terry | 9F | HP |

Midscreen
After a successful throw, Kimberly is +17F. After a forward throw, a micro-walk into wake-up pressure is possible without any tech. Back-teching causes a Drive Rush wake-up pressure situation. However, if Kimberly Drive Rushes against a no-tech, OD invincible is guaranteed — memorize this.
| Your option / Kimberly | With Drive Rush | Without Drive Rush |
|---|---|---|
| In-place tech | No wake-up pressure (OD invincible guaranteed) | Wake-up pressure active |
| Back tech | Wake-up pressure active (214P can evade OD invincible) | No wake-up pressure |
Recommended counters
- Characters with OD invincible:
- In-place tech → confirm Drive Rush → OD invincible
- Denying her offense here is the priority
- Characters with a far-reaching SA that starts in 8F or fewer:
- Back tech → confirm Drive Rush → SA (8F startup)
- 214P can evade OD invincible, but if your SA has great range and startup this covers everything
- This counter is especially effective for Luke, Blanka, etc.
- Check your character's SA startup and reach
Watch out
- In-place tech → confirm Drive Rush → OD invincible
- An excellent option, but remember that Kimberly can choose to absorb your invincible with Drive Impact
- Back tech → confirm Drive Rush → SA (8F startup)
- A 9F SA / Drive Reversal is safe-jumped (fastest Drive Rush → 2LK creates a 9F safe-jump)
- Stick to options with 8F or fewer startup
Corner
Kimberly's corner throw setups rank among the best in SF6. The throw is timed so back-dash doesn't escape cleanly. Against forward jumps, 2HP → 236K → Emergency Stop denies the escape while maintaining offense. 2MP creates a meaty cross-up setup.
To escape, use back-step rather than forward jump.
Recommended counters
- Forward jump doesn't work, so use it only if you have a strong reversal option:
- Blanka OD Aerial Rolling Attack, Chun-Li Air Hundred Rending Kicks, etc.
- If you lack a strong reversal:
- Kimberly's walk speed is fast so she frequently uses delayed HP — if invincibles keep getting blocked, consider fuzzy jump or one-guard jump
- Understanding delayed-option mix is essential for winning the Kimberly matchup
- If 2MP is catching your delayed tech, she is reading your throw whiff — walk-throw becomes a strong option


Recommended counters (on block)
- MP→HP→236K: Free 4F mash — you win
- MP→HP→236KK→Arc Step: Mash-killer — there is a gap so OD invincible wins
- MP→HP→Cancel Drive Rush→2LP: Not a true blockstring — OD invincible wins
- MP→HP→236KK→Emergency Stop: Invincible bait — read and respond accordingly
Recommended counters (midscreen on hit)
Kimberly's standard combo after MP→HP lands midscreen:
MP→HP→236K→Shadow Slide
When you eat this combo, always use in-place tech. Back-teching still results in guaranteed meaty pressure at close range.
Kimberly's options:
- Forward step → 236K → Emergency Stop: Kimberly +7F; back tech loses more ground; in-place tech prevents walk shimmy
- Forward step → Forward step → HK: Kimberly +11F; back tech loses more ground; in-place tech still allows walk shimmy
Conclusion: choose in-place tech.
- Step→236K→Emergency Stop is worse for you
- If SA3 is active, walk shimmy becomes possible — keep this in mind
- Large characters prevent walk shimmy even when SA3 is active
Recommended counters (corner on hit)
Kimberly's combo after MP→HP lands in the corner:
MP→HP→236K→Shadow Slide→Bushin Senpukyaku
Kimberly's options:
- 2LP (frame spend) → 2MK (low)
- Windmill Kick (overhead)
After spending frames with 2LP, walk shimmy is unavailable unless SA3 has been activated. Large characters cannot be shimmy'd even with SA3 active.
Kimberly needs to walk back significantly after SA, making the low reversal easy to land. Drive Reversal is NOT recommended here — 2MK re-stands on Reversal and gets blocked.
Conclusion:
- After SA3 is active: if you see 2LP, 2MK is likely; large characters can add fast-tech since shimmy is impossible
- Before SA3 is active: shimmy is unavailable, so fast-tech is also a valid option
- Do not use Drive Reversal (2MK re-stands and beats it on block)