
サガット
Sagat — 对策
Key Info
- Sustained overhead with combo available
- Defense
- OD invincible reversal at 8F startup: 623PP (Tiger Uppercut)
- Only DJ can land a meaty setup on it
- Anti-air invincible at 5F startup: 623LP
- SA1 Tiger Cannon (236236P): 13F startup, no projectile invincibility
- SA2 Savage Tiger (214214K): 10F startup, projectile invincible
- SA3 Tiger Vanquish (236236K): 12F startup
- OD invincible reversal at 8F startup: 623PP (Tiger Uppercut)
- Plus-on-block moves
- MP (Tiger Soak): Sagat +2F
- 6HK (Step High Kick): Sagat +4F
- 236LK on crouching block: Sagat +2F
- 236MK on crouching block: Sagat +2F
- 236HK on crouching block: Sagat +4F
- 236KK on crouching block: Sagat +1F
- 214K→6MK (Tiger Greed): Sagat +4F
- 214K→6HK (Tiger Nova): Sagat +2F
- 214KK→6MK: Sagat +4F
- 214KK→6HK: Sagat +2F
- 236MP (Tiger Shot mid): plus on block
- 236MPHP (OD Tiger Shot): +6F on block
Neutral Game (Focus Points)
- Dealing with 236K (Tiger Knee Crush)
- Standing block on Tiger Knee Crush gives Sagat advantage
- Sagat has no c.MK cancel that generates big reward on walk, so walking carries little risk. Stay in poke range and rely on whiff punishing — this naturally puts Tiger Knee Crush into a standing block
- If you can react, pressing Parry converts it into a standing block, putting you on offense
- Dealing with 6LK (Step Low Kick)
- Heavy side-stepping to avoid Tiger Knee Crush makes his long-range low 6LK easier to land on you
- Normal hit is not a combo starter, so do not over-respect it
- Spacing management matters more
- If you see it often in neutral, place neutral jumps to score damage on Tiger Knee Crush
- Place neutral jumps
- In addition to normals, Sagat has many options (236K, 6LK) — place neutral jumps against all of them
- Sagat can punish neutral jumps with 6HK, but forcing him to respect that opens up your other options
- Use back-step at moderate intervals
- Concedes stage position but carries no risk from his 6HK anti-air
- On back-step, the only losing read is a fireball — otherwise it is risk-free
- Block → fuzzy stand guard
- Expect Tiger Knee Crush cancels off his normals — stay aware of switching to stand guard during Sagat's pressure
- Parry is also very effective in place of guard; Parry counts as standing block so you may get a punish or even Just Parry reward
- Take your punishes
- Sagat frequently drops his Target Combo confirm — make sure you take full damage when he does
- 2MP→HP (Tiger Slash)
- Tiger Slash can be canceled even after the full motion, making it difficult to challenge
- There is an 8F gap between 2MP and the Tiger Slash follow-up — ideally press an 8F-or-faster normal every time you see 2MP
- The 2MP→236K cancel has a follow-up branch, so pressing a normal with upward hitbox is even better
- MK→HK (Step Middle Kick)
- The MK→HK branch crushes mash, so do not press buttons when you see MK
- If you block everything cleanly, you get an 8F punish — go for max damage
- HP→HK (Tiger Sting)
- Be ready to punish the moment you see HP
- -12F on block — start with a heavy normal for maximum damage





214K branches into a 3-way mixup — overhead (214K→6LK / Mighty Tiger), mash-killing high (Greedy Tiger), high mash-able (214K→6HK) — and cannot be fuzzy-blocked.
Recommended counters
Pick a read
- Reading 214K→6LK: hold the block and punish the -5 follow-up with your 5F starter
- Reading Greedy Tiger or 214K→6HK: after blocking 214K, mash a 4F button as fast as possible
- If your character has a 5F invincible super (Luke SA2, Ryu SA3, etc.): it lands clean — memorize it
If you have a 6F crouching medium, contesting after blocking 214K is an excellent risk/reward: whichever strength Sagat uses, every follow-up except 214K→6LK loses to a fastest crouching 6F mash. Even if the 6LK overhead connects, it's only 960 damage — your crouching punish-counter earns more than double that. Don't settle for "just block the follow-up." The clip records 214HK→214K→6LK / 6MK / 6HK:
Also note the 214K strength stretches your mash window from 6F up to 8F — after blocking 214LK / 214MK you can even contest with an 8F crouching heavy for more reward. The clip records 214MK→214K→6LK / 6MK / 6HK:
Fuzzy parry
Independent of strength, 214K→6LK and 214K→6HK have a 6F gap in startup. Hold standing block, then parry on the timing 5–6 frames after where the 6LK overhead would land — this covers both. Crouch-blocking is a trap because a missed parry gets you hit by the high 6HK; always stand-block.
The clip below records 214K→6LK (15F startup, always press your 5F punish on block) and 214K→6HK (21F startup — aim parries here; just-parry isn't worth chasing because the 6LK already gives a guaranteed punish on block).
Watch out: no-follow-up throw bait
Once you start parrying, Sagat will go for 214K → no-followup → throw. With no follow-up, 214LK / 214MK leave Sagat at -5 (5F punish guaranteed); 214HK / 214KK are -3.




The 214K→6HK branch. High, mash-able, +2 on block. 21F startup — the primary target for fuzzy parry.
Recommended counters
4F mash
Once you read Nova Tiger or 214K→6HK, mash a 4F button as soon as you finish blocking 214K. If your character has a 5F invincible super (Luke SA2, Ryu SA3 etc.), it's a guaranteed reversal — keep it in your back pocket.
The main fuzzy-parry target
214K→6LK and 214K→6HK are 6F apart in startup. Hold standing block and parry 5–6 frames after the 6LK overhead would land — that covers both. 214K→6HK (21F) is the main parry target; 214K→6LK already gives a guaranteed punish on block, so chasing a just-parry there is wasted effort. Stand-block is mandatory: a missed parry still has to defend the high 6HK.


The 214K→6LK overhead branch. 15F startup, -5 on block — guaranteed 5F punish on block.
Recommended counters
Hold the block, take the punish
When you read 214K→6LK, hold block (either crouch or stand works, but stand-block is mandatory if you intend to fuzzy-parry) and run your 5F punish on block. 15F is too fast to react and switch to crouch from a wrong guess, so call the read inside the pressure string.
Fuzzy parry to lock down the mixup
214K→6LK and 214K→6HK differ by 6F in startup. Hold standing block, then parry on a timing 5–6 frames after the 6LK overhead would land — covers both options. Always stand-block so a missed parry still defends the 6HK high. The clip below records 214K→6LK (15F startup, 5F punish on block) and 214K→6HK (21F startup, target for parry).


The 214K→6MK branch. High, mash-able, but +4 on block in Sagat's favor.
Recommended counters
4F mash
Reading Greedy Tiger or 214K→6HK: mash 4F as soon as 214K finishes blocking. The follow-up is a 17F high — it whiffs on crouch and only gets +4 on block — so the answer is to mash it down on read. A 5F invincible super (Luke SA2, Ryu SA3, etc.) lands clean.
Fuzzy parry covers it
214K's mixup is not fuzzy-blockable, but 214K→6LK and 214K→6HK are 6F apart in startup. Hold stand-block and parry 5–6 frames after the 6LK overhead would land — Greedy Tiger lives in that same parry window too. Always stand-block: a missed parry still has to defend the 6HK high.


After it hits, Sagat is at 15F advantage. 6HK or HP can be landed meaty.
6HK stays meaty even if you crouch, and leaves him +4F on block.
Recommended counters
- Drive Rush
- There is no Drive Rush oki here, so fire an invincible reversal the moment you see the rush
- 6HK
- If you do a crouching attack as a reversal, 6HK whiffs over you and you take the Punish Counter

A rushing attack that leaves Sagat plus on crouching block. Block frames get less unfavorable for Sagat from farther distances; if the spacing is wide, mix in Drive Impact or vertical jumps.
Recommended counters
Just parry
The startup is fast, but it often connects on its later active frames, giving you extra reaction time. 236MK in particular has a slow 18F startup and takes a while to arrive — a good window to hunt the just-parry. Watch for 2LK while fishing, and at 236LK-whiff range consider a fuzzy strike instead of the parry.
Stand-block once you've blocked a normal
After blocking any normal except 2LP, switch to standing block. Sagat has no 2MK drive-rush, so there's no low combo route from a single blocked normal other than 2LP. Reacting to 236K every time is exhausting, so default to "one-block then back away," and parry only when you actually see it.
Stand-blocked (not buried in)
If the screen shakes, Sagat is plus. If it doesn't, you're at 0 or better — mash a 4F poke or throw.
Stand-blocked (buried in)
If it lands deep on stand-block, you have a 5F-or-faster guaranteed punish.
On hit (quick-rise)
Quick-rising after 236LK denies Sagat the walk-up shimmy off drive rush.
Frame check on cancel-into-236K
On crouch block, the cancel routes leave Sagat at: 236LK +2 / 236MK +2 / 236HK +4 / 236KK +1 — every variant is Sagat-plus.
Watch out
Once you show just-parry attempts, Sagat may feint with 236LK — in that case, press a normal at the timing you would block the 236K:


236LP is a low fireball with relatively long recovery. If Sagat leans on it in neutral, forward-jumps have strong EV.
Recommended counters
Fuzzy 2HK against 236LP / 236HP
236MP / 236HP can be ducked under and punished with a crouching normal. You cannot react fast enough to distinguish 236LP from 236HP, so press 2HK in a fuzzy timing matching the 236LP block — it covers both: the low blocks normally, and the high gets whiff-punished by 2HK.
The clip below records 236LP and 236HP being mixed.


236MP / 236HP are high fireballs that whiff against crouching opponents. 236MPHP, when blocked point-blank, leaves Sagat at +6F.
Recommended counters
Duck under 236MP / 236HP
Don't reach for parry — duck. Parry-spam burns drive gauge for nothing here. Once you confirm the fireball, 2HK lands clean as a whiff punish.
236MPHP
Mostly used as corner pressure. If you block it point-blank, recognize that Sagat is +6 and respect it.
Fuzzy 2HK against 236LP / 236HP
236MP / 236HP can be ducked and punished with a crouching normal. You can't react fast enough to tell 236LP from 236HP, so press 2HK in a fuzzy timing matched to the 236LP block — the low gets blocked, the high gets whiff-punished. The clip below records 236LP and 236HP being mixed.



Everything from 2MP branches into a mix-up, and both sides carry risk and reward on every option — keep that in mind.
With so many cancel options it is hard to cover everything, but landing your punishes properly and attaching risk with Drive Impact is what matters.
Sagat's main options are as follows:
- Tiger Slash→cancel Drive Rush→2LP
- a pressure continuation Sagat can run at low risk
- it is a true blockstring, so you cannot mash an invincible reversal in between
- Tiger Slash → 214K
- 214LK crushes mashing and pairs with his other options, which makes it strong
- remember that if you confirm the target combo being finished, Drive Impact is guaranteed
- Tiger Slash → 236HK
- a gauge-chipping rip-off
- remember that if you confirm the target combo being finished, Drive Impact is guaranteed
- crouching leaves Sagat at advantage, so stand-block it
- Tiger Slash → cancel Drive Rush → 2LK
- the option that answers fuzzy stand-blocking
- there is a gap, so an invincible reversal is guaranteed
- Tiger Slash → OD Tiger Shot
- chips your gauge and keeps his pressure going at +6F on block
- you can mash a 4F button in the gap of the target combo
Recommended counters
The gap inside 2MP→HP is 7F. If he does not cancel after it is blocked, Sagat is -14F.
- Invincible reversals
- Except against cancel Drive Rush→2LP, the gaps mean your invincible reversal cannot be blocked
- With no follow-up it is -12F, so the reward is lower, but it is a safe way to turn the situation around
- If you trust your inputs, aim to escape with an SA instead
- he has the 236MP fireball cancel, so do it with a move that has projectile invincibility
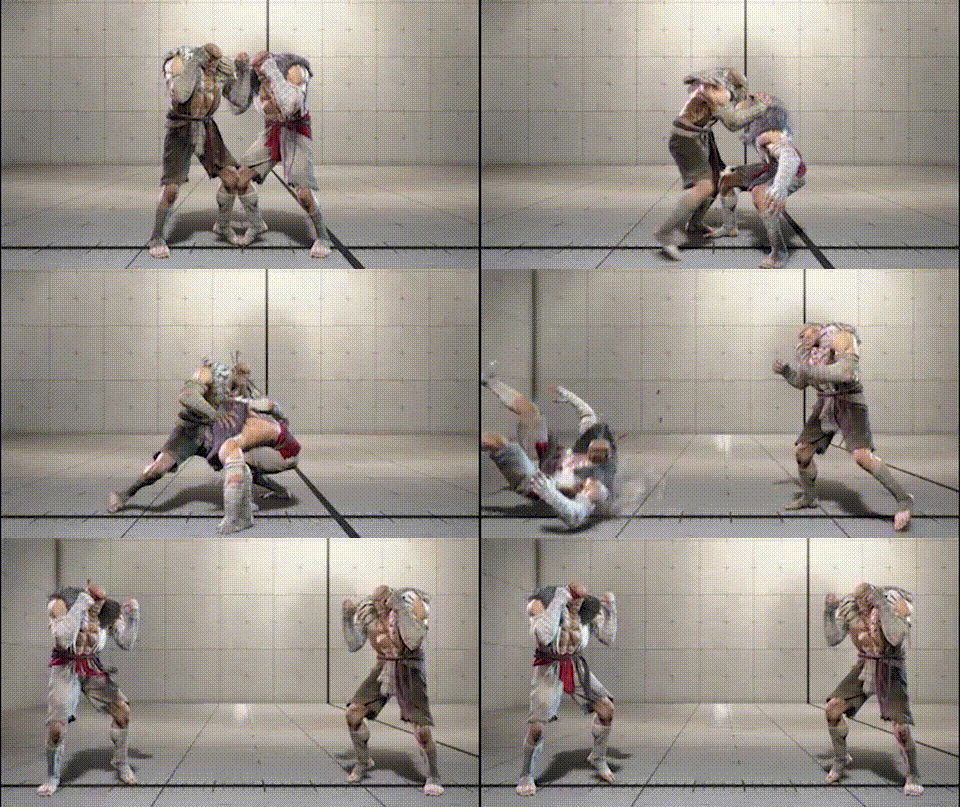
Sagat is +21F after the throw. Even if Sagat follows with Drive Rush, an invincible reversal will not land as a guaranteed punish. Taking a back-roll puts distance between you and denies wake-up pressure.
Recommended counter
Take the back-roll.
Even after the back-roll, Sagat may force the issue with a Drive Rush — his strike can't connect unless he delays it, so the same options as against his forward throw (LPLK) are very effective: Drive Impact, neutral jump, back-dash:

Counter-strategy for Tiger Uppercut — punish frames, blocking direction, yomi paths — to be added. On block every strength (including the held version) is between -37 and -45, so always commit to a guaranteed punish.
After a 623P hit, an in-place tech kills the walk-shimmy option out of his drive-rush oki — don't tech on auto-pilot. If you tech in place and Sagat didn't spend the rush, a slight walk forward even gives you your own oki:

A command normal that is +4 on block. Avoidable by crouching.
It forms a two-option mixup with 236K, but the risk is relatively high so there's no need to over-respect it. Sagat rarely uses it in neutral — it is mainly used to punish vertical jumps.
Recommended counter
- Planting a backdash puts risk on all three of 6HK / 6LK / 236K at the same time.

Sagat is -12F on block.
Recommended counter
Punish with a heavy normal.
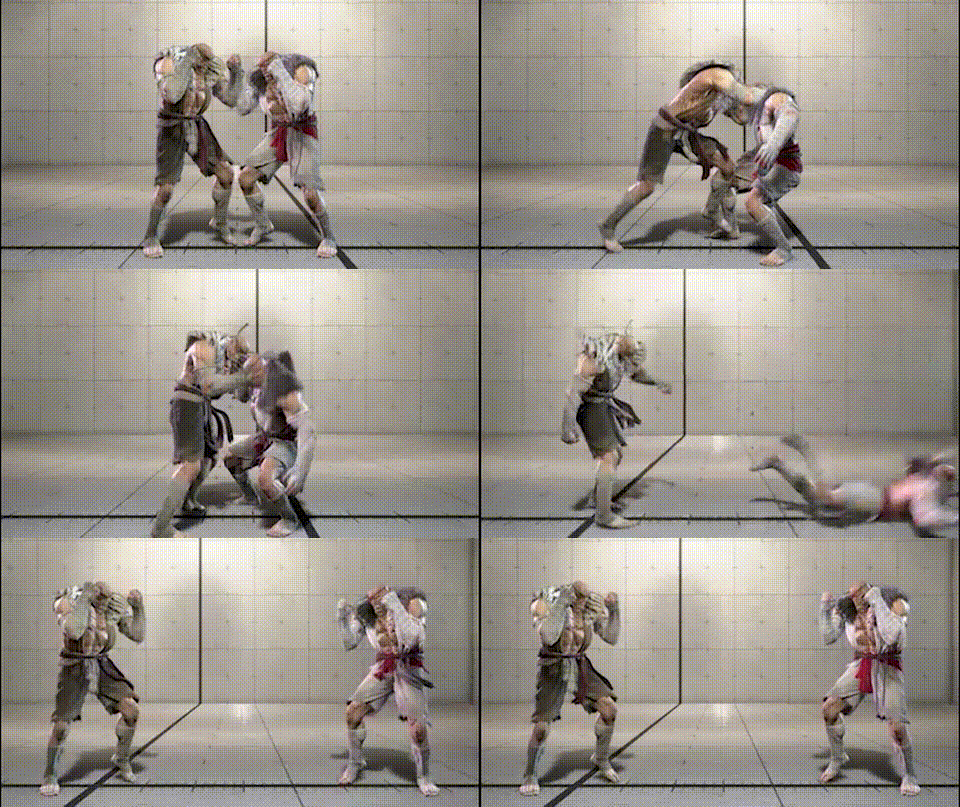
Sagat is +21F after the throw. Even if Sagat follows with Drive Rush, an invincible reversal will not land as a guaranteed punish. Taking a back-roll puts distance between you and denies wake-up pressure.
Recommended counter
Take the back-roll.
Even after the back-roll, Sagat may force the issue with a Drive Rush — his strike can't connect unless he delays it, so the same options as against his back throw (4LPLK) are very effective: Drive Impact, neutral jump, back-dash:
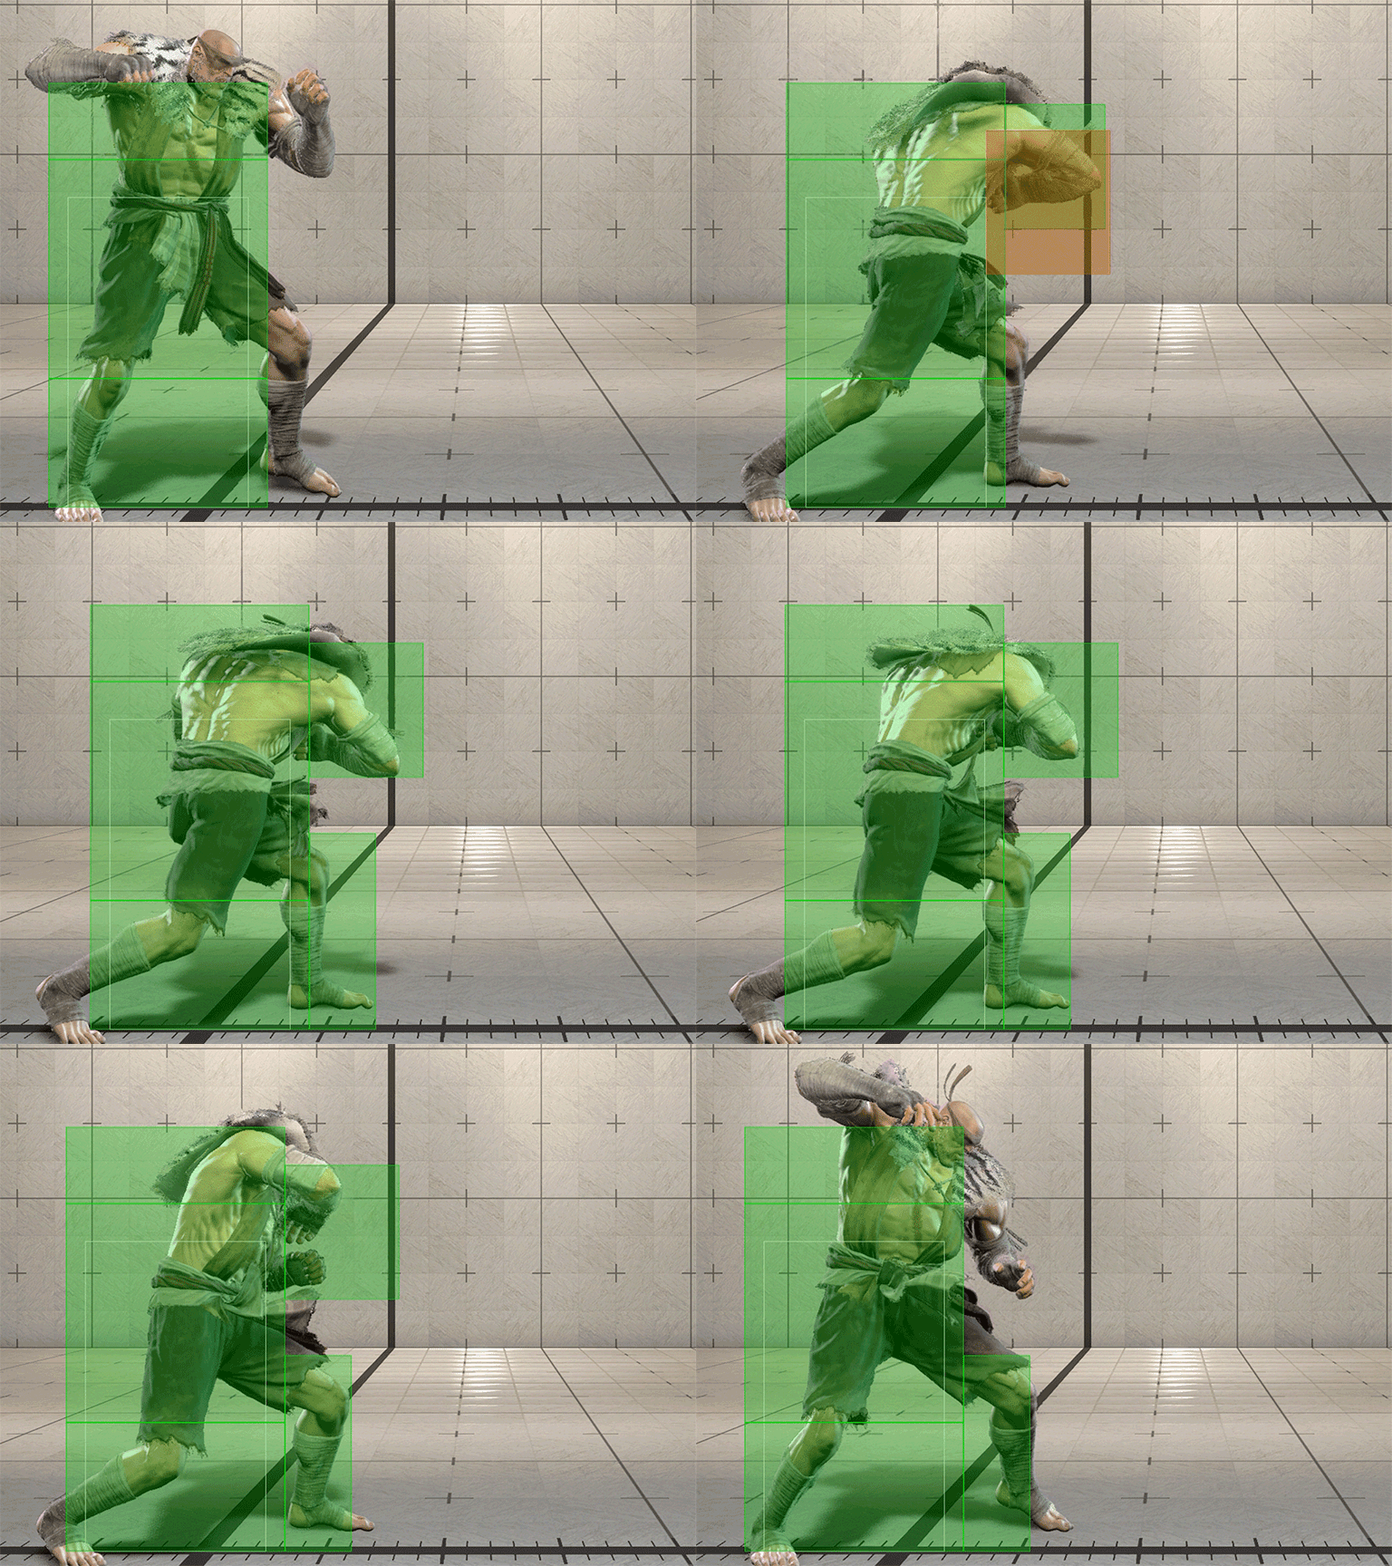
A normal that is +2 on block with minimal pushback, allowing Sagat to chain into a second 2MP as a blockstring.
Recommended counters
Mid-screen
- After blocking (mid-screen)
- Unless Sagat follows with Drive Rush into MP, walking back is a low-risk way to end his pressure.
- After blocking (corner)
- Mashing a 4F button after blocking MP will trade, setting up a combo for Sagat.
- After blocking — characters with a 4F standing normal
- Mashing a standing normal immediately after blocking point-blank MP creates distance where Sagat cannot link into 2MP on trade.
- If it wasn't a meaty hit, your best bet is to mash 4F MP.
- After blocking — characters without a 4F standing normal
- Read between Just Parry and waiting it out.
- Sagat's walk speed is slow, and no matter what he does, he needs at least 6+ frames of walking to reach throw range — so pressing a button on the fuzzy timing when you'd block 6MP is a solid option.
- Fuzzy light punching the reversal attempt is an option, but if Sagat walks and throws well or delays the MP it will counter-hit very frequently, so pressing MP immediately on MP-block to fish for a counter-trade return is also worth considering.
- The key is to make his walk throw carry risk — once you show it, bait the next Just Parry attempt.
- MP → MP
- Ideally Sagat should hit-confirm before continuing, but MP is so strong that many Sagats auto-pilot MP → MP.
- Against that habit, forward jump is a great answer — it also beats MP → throw.
- The second MP has no combo on normal hit, so even an immediate jump is worth considering.
- MP → MP → 2MP
- Holding forward-jump while blocking the second MP is very effective.
- You can collect a reward against anything Sagat cancels the 2MP into.
- Zangief and Lily can't use this — their jump transition is too slow.
- You can collect a reward against anything Sagat cancels the 2MP into.
- Holding forward-jump while blocking the second MP is very effective.
Advanced
A fuzzy forward jump collects the best parts of all the answers above: on the second MP of MP → MP → 2MP, fuzzy forward-jump beats MP → throw, and if you end up blocking, jump immediately after guarding the 2MP. It's very busy, but worth the effort:
Moves that can combo after a 4F trade off point-blank MP → MP
List of moves (by character) that can be picked up after a 4F mash trades off a point-blank Standing MP → Standing MP.
| Pickup move | Characters |
|---|---|
| 2MP | Luke / Jamie / Manon / Marisa / JP / Juri / Cammy / Ryu / Honda / Chun-Li / Zangief / Dhalsim / A.K.I. / Ed / Akuma / Bison / Terry / Mai / Elena / Sagat / Viper |
| 2HP | Kimberly |
| HK | DJ |
| 2MK | Blanka |
| LK | Guile / Lily / Rashid |
| HK OR 4HP | Bison → Standing LK |
| LP | Ryu / Ken / Akuma / Ed / Terry |
| 2LP | Mai / Chun-Li |
Note
This is a 4F standing-normal counter strategy, but LK into cancel SA does have some return value in theory — it hasn't been seen in practice, so it can be ignored for now.